
|
No part of the Computer Software or of this Document may be reproduced or transmitted in any form or by any means, electronic or mechanical, including photocopying, recording, or by any information storage and retrieval system, without permission in writing from Ebiexperts. The information in this document is subject to change without notice.
If you find any problem with this documentation, please report it to Ebiexperts in writing at support@Ebiexperts.com.
Ebiexperts does not guarantee that this document is without errors.
WIP: Your “Work-In-Progress” Management Solution.
WIP Lifecycle Management
WIP manages and controls all aspects of a file throughout its lifecycle, from its requirement to retirement.
Whether you are a business user, analyst, developer or administrator within the system, WIP ensures you are in complete control of your work at all times.
Change Lifecycle
Change Request Lifecycle Management
Collaboration & Notifications
User Work Assignments
Agile Release Management
Source & Quality Control
Change Control Management
Version Management, Comparisons
Data Lineage and Impact Analysis
Quality Management
Complexity Analysis (Qlik)
Publication Management
Admin Control
Central Administration Management
Governance Management
Audits
Copyright © 2001-2022 by Ebiexperts Limited.
All Rights Reserved.

Create an Issue Without a License
Users without a WIP license have the option to create an Issue on the Board without a license, the limitation is the User will not be able to view, manage and track the Issue. The user will require a WIP Board license for access to the Board.
WIP provides three license types:
Access as Developer - Development Users:
User license which can be assigned full rights and access to full capabilities of the software but cannot modify the options and parameters of the software
Access as User/Admin - Admin Users
The user can act as an administrator and modify the options and parameters of the software. Admin users have access to the Configuration part of the menu. An administrator can also be a developer
Access as User/Admin - Business Users/Analyst:
User license which can be assigned limited rights
User can access track and monitor their own Board and issues
User can collaborate with other users
Workspace
This is the environment you will login to, it is the environment where you will make changes to your apps and files. Best practice you should only login to the DEV environment to make your changes.
Username
Login user using the format DomainName\Username
Password
Enter your password
Login Mode
This will determine your password type
All users are required to log into the system.
A username and password is required for login.
The login mode depends of the Plugin you are login against, for Qlik, login can be achieved by entering a WIP assigned user or WindowsAD integrated user authentication which would be integrated to your existing active director or LDAP directory. For Plugins like SAP then all SAP Analytics login modes will be available.
If your organisation is running Active Directory (AD), then it is very likely that WIP has been integrated to this system and you can use the same username and password you use to sign into your own domain or computer. The username will take the format of: domain\username
Please contact your system administrator should you have a license assigned and your login is not working or request access via the login page.
When you login you will be requested to select both a product as well as a Workspace. A workspace will define where your files will go when you check your applications in/out.

When you select a product such as Qlik Sense, QlikView or SAPBO the Workspace you are able to select will filter based on your access rights to such workspace so if you don’t have the rights to access a workspace it will not be on the list to select. Should you require access to a workspace which is not on the list please contact your administrator.
Users can request access to the WIP application by filling out the “Request Access” form.
In the Login Screen click on “Request Access” button to open the form.
Note: The user is not able to set up User Rights as only an Admin Use can set up rights for a user.

Fill out all the required fields in the user access request form and submit the form.

Logon Name:
The name of the User
The user name is generally in the form “Domain\User” for QlikView (AD) or “User Directory\User” for Qlik Sense. Generally, this would be the same format you would use to access a windows machine on a company domain
This should be assigned correctly, and informed, by the system administrator
First Name:
Name of the user
Last Name:
Surname of the user
Password:
The password to be utilised.
The password field is used to login using the password method
For Qlik Sense once logged into WIP, the “User Directory\User” string will be sent to Qlik Sense and if the certificate provided is ok then the connection will be established
Confirm Password:
Repeat the password
Description:
A brief description about the User.
It would be good to inform the Admin user, who will approve your access application of who you are and what your role is within the organisation.
Business Unit:
Click the drop down and select on or multiple Business Unit(s)
Business Units are set up by the administrator user so if your business unit does not exist please contact the admin users
Business Units are very important as users are assigned to business units and become visible when a user selects that business unit i.e. if a user wishes to assign an issue to a user, the user will be visible under the business unit selected by the user
Email:
A valid email address of the User, email is required to receive notifications
Phone:
Phone number of the User, for reference only
Employee Number:
Employee number of the User. This will allow the admin user to find the user on the user directory and validate the user
Once logged in, at the top of the page you will see details about your login information.

Burger Icon
Click on the icon to open the WIP menu, you might only see certain parts of the menu depending if you have the license and the rights to view them.
Environment
The logo of the product and the environment name will be displayed.
Role
Your role that is defined by your rights will be displayed. It will either be Admin / Developer / User.
Username
Your username is displayed. You can click on your username to edit details about yourself such as your identification, avatar and install a client addon if you are using QlikView or SAPBO. If you are an administrator you will be able to see the User Rights page.
Information Icon
Click on the info icon to see what version of WIP is installed, as well as download links to useful documentation.
Search
This is a global search feature, type in what you are looking for and a list will populate. Search for anything from files names to file metadata.
Help Icon
Link to our Help Guide.
Logout Icon
This will log you out of the WIP software.
The I-Frame is suitable for any Qlik Sense Application.
We recommend to add the I-Frame to the Ebiexperts Governance Application:
Please ensure an Administration user has uploaded the Ebiexperts Extension to your Qlik Sense Server
Open Wip sheet from the WIP Governance App

Click on Edit Sheet
Select the IFrame object
Expand the Url Accordion.

Insert the WIP Url
Click on Done editing

Now, you should have WIP running inside the WIP Governance app.

The Board is a central management for all agile development of issues requested by both developers and business users. The objective of the Board is to ensure requestors, and interested stakeholders, of issues thus development work, are in sync with the developer performing the work. The Board and issue properties such as tasks, comments and notifications ensure development and collaboration between development requestors and developers are managed efficiently.

The Board structure is both vertical and horizontal.
Horizontal movement across the Board follows a process of work that takes issues from your To-Do across the Board to Done statement. Horizontal movements can be both right and left so issues can move from In-Process state to On-Hold state based on waiting periods and so forth.
Vertical movement across the Board moves issues from the DEV environment as releases to QA/UAT environment and publishing files from the QA/UAT environment to the PRD environment.
The Board provides integrated issue migration actions that will perform actions on your issues when they are dropped into the specific area in the Board.
Board filters enable the user to quickly cut through the Board and concentrate only on their own issues, or issues specifically aimed at a certain business user of by issue type.
Issue Filter

The following Issue Filters are available:
My Issues
My Issues will reflect all issues which have been assigned to you
Reported By Me
Reported By Me will reflect all issues that you have reported
Subscribed To
Subscribed To will reflect all issues that you are subscribed to as an interested party
Recently Updated
Will reflect all the recently updated issues
Business Unit Filter

You can filter by clicking on the Select Business Unit dropdown and selecting a Business Unit, the Board will filter all the selected business unit’s issues on the Board.
Issue Type Filter

You can filter by clicking on the Issue Type dropdown and selecting an issue type, the Board will filter all the selected Issue Type issues on the Board.
Search

Type the name of the specific Issue or Release you are looking for.
You can create a new issue by clicking on the Create New Issue button near the top right of the screen. This will bring up the issue form from which you can create you issue by filling in all the information. The refresh button will refresh the Board page, this can be useful when Syncing the Board with Jira.

Issue Create Form
The WIP system enables users to create issues without requiring a license to access the system. Unlicensed users can create issues, but are unable to access, track and monitor, attach files and attachments, and collaborate with developers around the issue.

Is Backlog
Check this box if you don’t want the Issue to appear on the Board but instead go to the Backlog page under Boards.
Active
Check this box to make sure this is an active Issue and will appear on the Board or backlog. Disabling this Issue will create the Issue as inactive but can still be found on the Manage Content: Manage Issues page.
Issue Name
Provide a suitable name for your issue. This will allow the developer to understand what your issue is about before going into the detailed description and tasks.
Issue Type
Select your issue type
Error Correction:
Error correction is used for errors within the application/file. Errors are generally data validation, incorrect rule, objects new working and would have an adverse effect on the usage of the file
Improvement
An improvement would be requested when the user wishes to improve an existing feature, view, calculation or visualization object.
New Feature
A new feature request can be done for any new file creation requirements, or when something does not already exist within the files and you wish to add something new to the file.
Description
Provide a suitable description for your issue. It is recommended that you provide as much details as possible around the issue to ensure it is understood by the developer.
Tasks
Tasks are very important as they measure the total completion of the issue so all changes you wish to apply to the files should be listed as tasks. Tasks are closed by the developer as they are fixed.
Users should be able to agree with the developer that the tasks are implemented correctly thus as a licensed user you are able to follow tasks completions which you will receive as notifications from the system.
You can add as many tasks as is required for the issue
Subscribers
Subscribers are people you think would benefit from being informed about the issue and the processing of the issue. Subscribers are always licensed users within the system and as such will receive notifications around the issue i.e. as the issue is migrated across the Board, or tasks are completed or comments are raised.
Business Unit
All licensed users of the system belong to a business unit
Business units enable the administrators of the system to easily manage the resources available to perform work around issues.
When you select your business unit the user list in assignee field will filter based on the users assigned to the business units
This is a good way to find development users for your business unit
Assignee
Business unit will filter the assignee list to make it easier for you to find the relevant people you wish to assign the issue to.
Assignee is responsible for processing the issue
Priority
Low
The issue is not effecting the user experience of the file
Does not have any adverse effect on the environment
Does not affect the user’s interpretation of the data
Medium
The issue may be effecting user experience
May have adverse effect on the environment
May potentially affect the user’s interpretation of the data
High
The issue is effecting user experience
Is having an adverse effect on the environment
Is affecting the user’s interpretation of the data
Critical
File is not accessible
File is not working correctly
File is affecting the environment adversely in a way that would cause the environment to become unstable
Save
Click the save button once you are satisfied with all the information you have provided around the issue.
Clicking the save button will process active issues to the Board as well as into the issue list
Example of your issue under active issue list. The Issues you create on the Board will also be listed on the Issues page in the WIP menu.

Once you have saved your issue you can now add additional content to your issue such as link your issue to a file, or add attachments such as specification requirements or project plans.
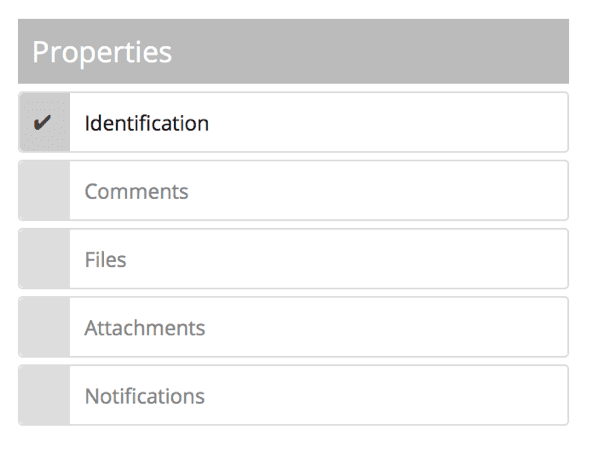
Comments
The comments section will show all comments every added to the issue. You can add comments which will show on the issue and visible for the developer to review.

Files
You can add files to your issue.
Clicking on the file selection dropdown list will provide you with a list of all files, you can type into the dropdown list to search for your file in the list and make it easier to find the file in question.

Click on the Add button to add the file
You can only add one file at a time so perform this task multiple times should you wish to add additional files to the issue.
Attachments
You can add attachments to your issue. Attachments such as specification documentation, business plans, project plans, budget approvals and so forth are good supporting documentation for any issue and would ensure efficient processing of the issue.

Notifications

All notifications that have been sent around the issue will show here.
Notifications are sent when:
Issues are moved on the Board and thus statuses have changed
Comments are added to the issue
Tasks on the issue are ticked off as completed
Issues are released to UAT
Issues are published to PRD
Once you save your issue all changes will be updated to the issue.
As a non-licensed user this is where your interaction with the issue on the system stops. You can communicate with the assigned developer via email for updates. Should you wish to track and monitor the implementation of your issue please contact your administrator for access to a user license.
Our Board enables you to drag and drop issues across the board and by doing so will affect the status of the issue or create a release of the issues or publish the issue linked file into a publication environment as set up by your administrators.
Please Note: Moving an issue across the board means that notifications will be sent to the reporter and interested parties identified on the issue.
Generally, publication environments support the development process as follows:
DEV
The DEV environment is the Development environment where all files should be checked-out to when you wish to develop them further. The development environment generally would be a development node or stream in Qlik Sense or a shared development folder in QlikView.
The development environment generally would not allow for business users to access it, but would purely be for developers to investigate, apply fixes and perform their own testing before they release a file to the business user for testing.
In the Board this method of work is supported enabling the developer to move his issue and associated file across the board based on his development process. Issues can move either left or right across the board and dropping them into certain statuses on the board will change the status of the issue accordingly.

To Do Column
The To Do column provides two options when you drag your issue across the Board . Dropping your issue into these highlighted areas called bands will change the status of the issue accordingly.
Open Band
Whenever a new issue is created it will be posted into the DEV stream with a status of Open.
Reopen Band
The reopen band change is used for issues that have been rejected or resolved before so that issues can be reopened subsequent to the decision being taken, and reopening the issue instead of creating a new issue means you can retain all historical changes and collaborations around the issue.
Done Column
The Done column provides three band options when you drag your issue across the Board . Dropping your issue into these highlighted bands will change the status of the issue accordingly.
Rejected Band
The rejected band should be utilized for issues that have been rejected by either the developer, stakeholder and or business user.
Resolved Band
Resolved means that the issue has been resolved through a fix or it could not be replicated but the requestor has accepted that the issue can be resolved. Resolving the issue keeps the issue in the stream so you should deactivate the issue if you wish it to be removed from the board.
Create Release Band
Please Note: Business Users are not able to create a release
When you drop your issue into the Create Release band the WIP system will create a release of the issue and place it into the UAT stream with an Open status.
Creating a release is the only way to move your issue to the UAT stream, and that is as a release of the work that is now ready for testing by the user.
UAT
The User Acceptance Testing (UAT) stream functions under the same columns of the Board and provides for three drop options within the Done column.
The user acceptance testing process is an iterative process between the developer and the user for testing the work that has been performed on the file. The developer will publish the file so that the testing user can access the file in the UAT/Test/Pre-PRD publication environment and will move the release across the UAT stream as the testing commences.

Rejected Band
The rejected band should be utilized for issues that have been rejected by either the developer, stakeholder and or business user.
Resolved Band
Resolved means that the issue has been resolved through a fix or it could not be replicated but the requestor has accepted that the issue can be resolved. Resolving the issue keeps the issue in the stream so you should deactivate the issue if you wish it to be removed from the board.
Publish
Please Note: Business Users are not able to publish applications
The publish band enables the developer to publish the release into the production (PRD) environment.
Dropping the release into Publish will bring up the publication view which enables the user to publish the file to an environment.

A release can be dragged across to the PRD environment

PRD
The Production (PRD) stream functions under the same columns of the Board and provides for three drop options within the Done column.

Rejected Band
The rejected band should be utilized for issues that have been rejected by either the developer, stakeholder and or business user.
Resolved Band
Resolved means that the issue has been resolved through a fix or it could not be replicated but the requestor has accepted that the issue can be resolved. Resolving the issue keeps the issue in the stream so you should deactivate the issue if you wish it to be removed from the board.
Publish
Please Note: Business Users are not able to publish applications
The publish band enables the developer to publish the release into the production (PRD) environment.
Dropping the release into Publish will bring up the publication view which enables the user to publish the file to an environment.

Issues will appear on the backlog either if you have checked the Backlog box when creating an Issue or if it is a Backlog Issue from Jira. You can drag the Issues here to reorder them.

You can click on a Backlog Issue to see and edit more details on the right pane.

The individual Issue details are as follows
Move to the top of the backlog
Move to the bottom of the backlog
Move the Issue to the Board
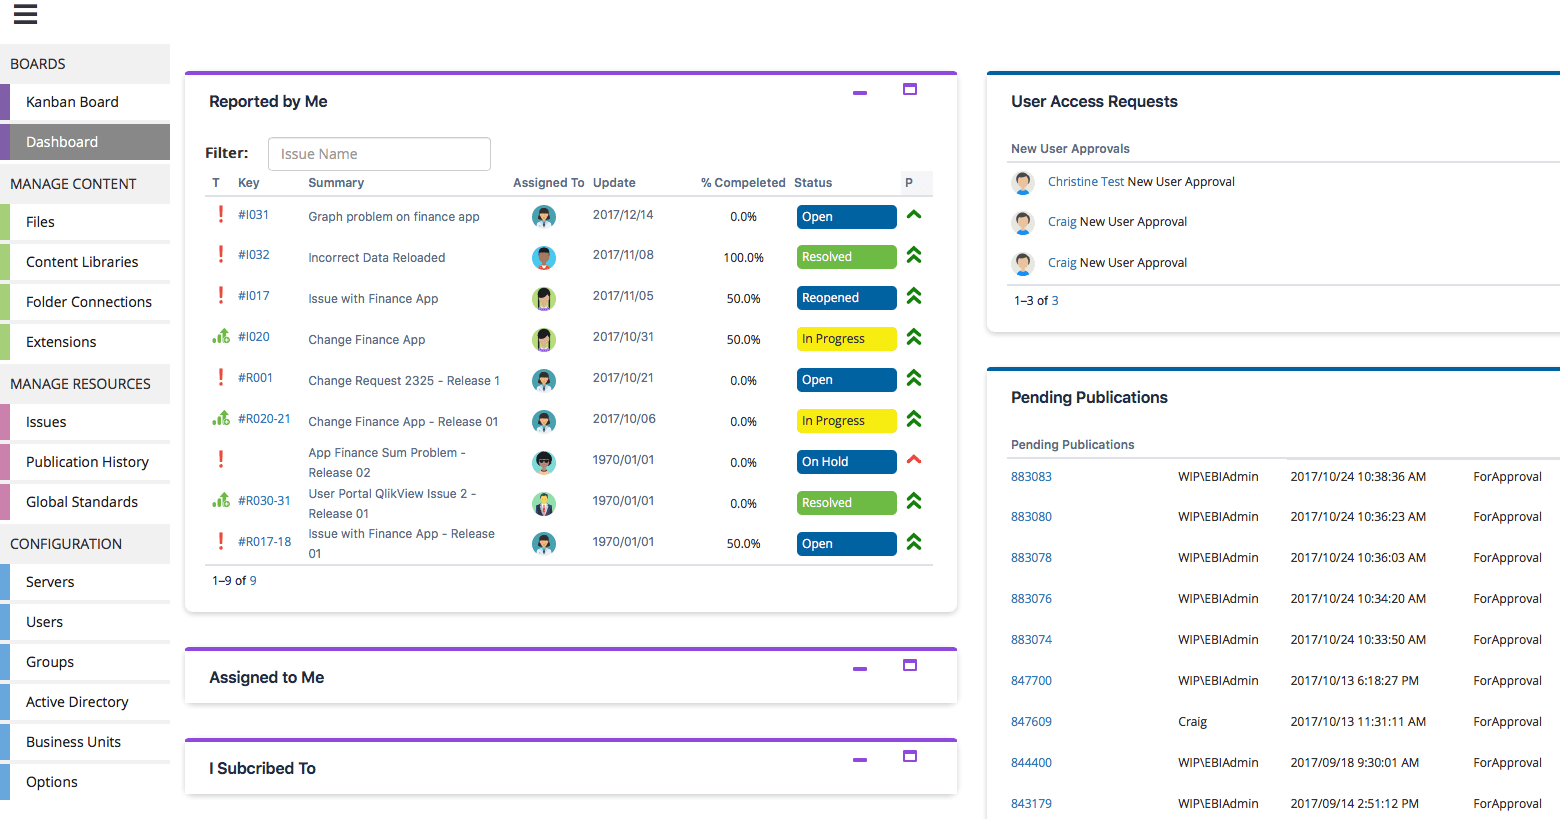
The dashboard provides a complete view of the user’s activity across the system.
Business users can only see their own content
Developers can see their own content
Admin users can see all the content
The dashboard is broken up into four sections
Reported by me
These are all issues reported by the signed in user
Assigned to me
These are all the issues assigned to the signed in user
I Subscribe to
These are issues I have subscribed to as an interested party
Notifications
All notifications will reflect in this section
User Access Request (Admin Users Only)
This view presents a list of users that have requested access to the system
Pending Publications (Admin Users Only)
This view presents a list of users that have requested the admin user to publish applications / files for them. This would mean that the user either didn’t have the rights to publish to a certain environment or the user’s file does not meet the complexity threshold of a certain environment.

All Users that login to the WIP system will be allowed to view the Collaboration page. This page displays useful information about your company, such as links to relevant websites, groups, emails, telephone numbers and attachments. The WIP administrator user can customise the Collaboration page in the WIP Options.

Depending of the security rights assigned to you you can see different Folders and Files Menu.
At the beginning you must create one or multiple first level folders using “Create Root Folder”
Then create sub folders using “Create Subfolder”. You can move a subfolder to root using Move To Root.
You can then move folders to different places using “Drag & Drop”
Edit Folder give you access to the folder properties to rename and set Folder Security
WIP is managing security at a folder / group level. First assign your users to the different groups

In the folder Security tab, you can set the different groups security.
The owner of the folder have an admin right on the folder, you can change it in the top, select new owner then press “Change Owner” (note : you need the Own right to do it)
Reset permissions on All Child Element and Enable Propagation
Checking this option will reset and propagate current folder permissions to all the subfolders.
Manager : the user is the global manager (VMMANAGER) and act as an Super Admin that have all the rights everywhere, will be treated as an → Admin below.
Owner : the Owner of a folder act as an → Admin of the folder
Admin : the user belong to an Admin group
Read
Write
Create
Delete
Publish
ChPer (Change Permissions)
Own : (Change Owner)
PubProp : (Change Publication Properties)
Folder Write → parent folder Write
Folder Delete → parent folder Delete
Action | Right(s) | Description |
|---|---|---|
All Files | Only Admins | Show all files without security |
Create Root Folder | Only Admins | Create a first level folder |
Move to Root | Only Admins | Move a subfolder to root |
Create Subfolder | Create | Create a subfolder |
Edit Folder | Folder Write or Admins | Edit folder to rename and change permissions |
Edit Folder / Security | ChPer or Admins | Edit folder to change permissions |
Delete Folder | Folder Delete or Admins | Delete a folder |
Migrate to SAP | Only Admins | For SAP migrate document to universe folder |
Action | Right(s) | Description |
|---|---|---|
Edit | Read | Edit a file properties |
Open | Write + be the user that made the Check Out | Open a file on the related server |
Check Out | Write | Check Out a file in your workspace for editing |
Check In | Write | Check In a file and create new version |
Publish | Publish | Publish a file |
Publications | Read | See the versions published in the different environments |
Destinations (View) | Read | See and Edit destinations |
Destinations (Edit) | PubProp | Change the destinations for Check Out and Publish |
Change Proc Status | Write * | Reprocess a file |
More / Properties | Write | See the file metadata |
More / Compare | Read | Compare the 2 latest versions |
More / Delete | Delete | Put a file in the recycle bin |
More / Get | Write | Get a file in your workspace for viewing |
More / Undo Checkout | Write | Cancel the checkout and remove the file lock |
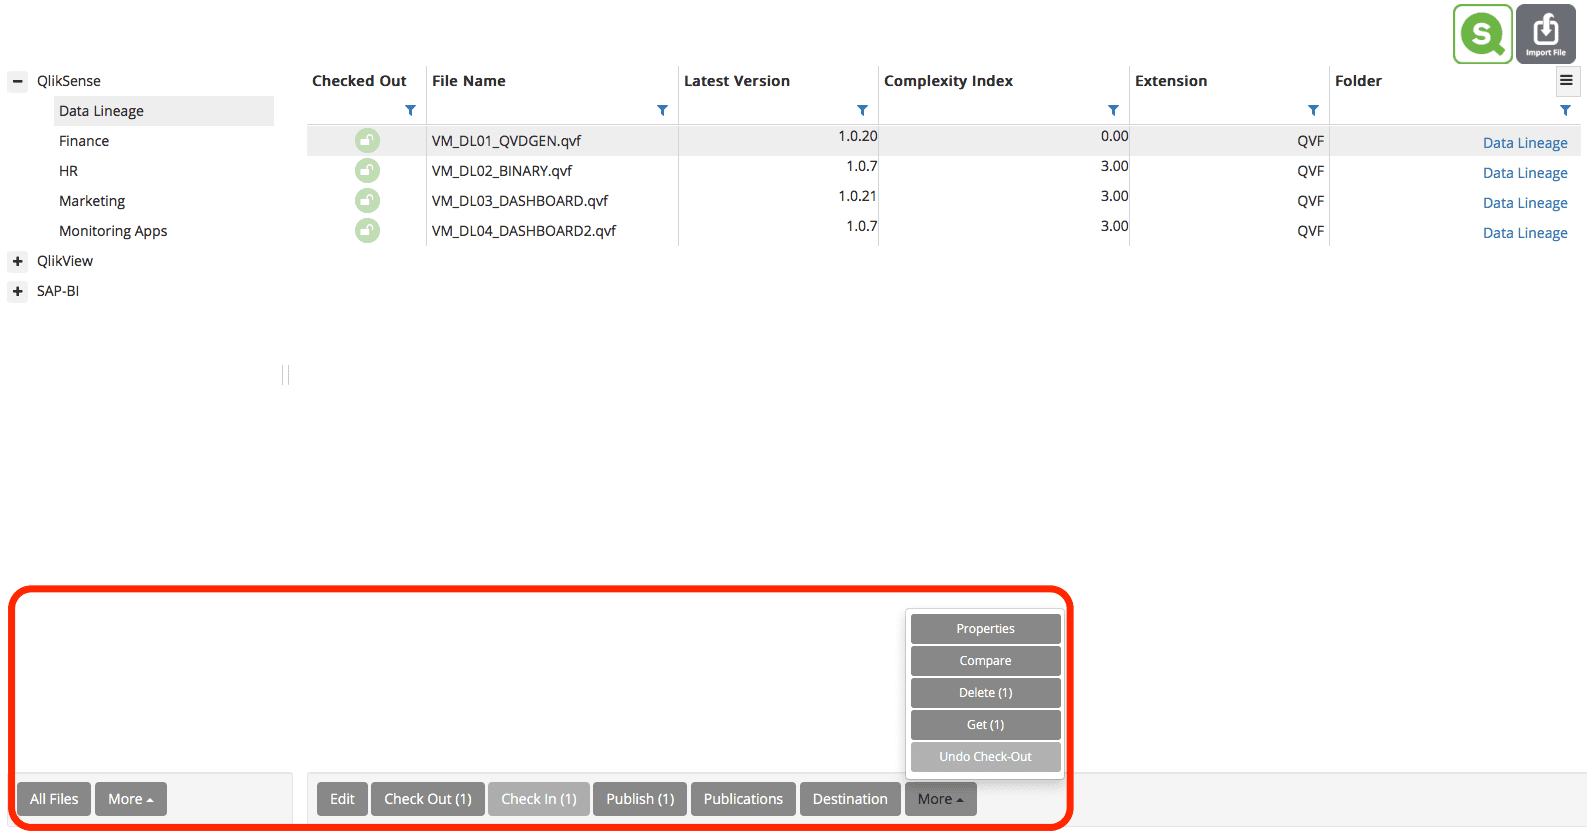
The files section is where you manage all your files, both in the WIP repository as well as access files via the Application Protocol Interface (API) integrated to your product-based files and repositories.
You can access the WIP repository files from the hierarchical folder section as per the image provided.

You can browse your files in each folder and see them based on their checked-in/out status or you can search using the column based provided search fields.
All Files
Selecting the all files button will show all the files in the repository within the files list pane.
More

Clicking on the More button opens up the various options you have under the more option.
Move to Root
If the folder you have selected is a subfolder, this function will move the folder to make it a root folder
Create Subfolder
Subfolders are created into a sub hierarchy of the existing folder you are in. To create a subfolder, click on the folder you wish to have as the subfolder’s parent folder, click on more and create subfolder. This will create a subfolder underneath the current folder you are currently accessing.
Create Root Folder
A Root folder is the highest-level folder you are able to create. You can create many levels of subfolder structures underneath a root folder.
Edit Folder
Will enable you to edit the folder you have currently selected, so select a folder and click on the Edit Folder button to edit the folder. The edit folder option will enable you to change the folder name and assign different security groups to the folder level.
Delete Folder
This will delete the folder, take care as all content inside will also be deleted. If files are deleted you can find them in the recycle bin.
Creating a folder will require that you provide both a name and assign group level security to the folder you are creating.
Once you have saved your folder’s name you can assign group level rights to your folder by clicking on Security tab.
You can both add and remove groups from a folder by clicking the respective buttons and accepting the action.

Folder Security
You can access folder security by choosing Edit Folder from the menu list and choosing Security from the Properties section
WIP enables users to assign group security levels to folders. This will enable different groups to be able to interact on files within a folder in different ways
Read
Groups that have this assigned will be able to read (view) the files within the folder
Write
Groups that have this assigned will be able to edit and work with files within the folder such as check-in/out
Create
Groups with Create rights will be able to add files to the folder
Delete
Groups with Delete rights will be able to delete files within this folder
Publish
Groups with Publish rights will be able to publish files within this folder
ChPer (Change Permissions)
Groups with Change permissions rights will be able to change the permissions on the folder
Own (Change Owner)
Groups with Change Owner rights will be able to change the owner of the folder
PubProp (Publication Properties)
Groups with Publication Properties rights will be able to change the publication properties of the folder
Please see security section for assignment of group rights
You can assign, and affect security after the fact, group level security to a sub hierarchy by ticking the Reset permissions on all children and enable propagation. This means that changing the security after you have set it will propagate the changes to all the subfolders of the folder you are currently editing.
Edit Folder
Click on a folder and click on edit folder to edit the folder you are currently in. Editing the folder will enable you to change the folder name and group level security access to the folder.
Delete Folder
Click on a folder and click delete folder in order to delete a folder.
Please Note: Deleting a folder will also delete all the subfolders to that folder.
Table of contents
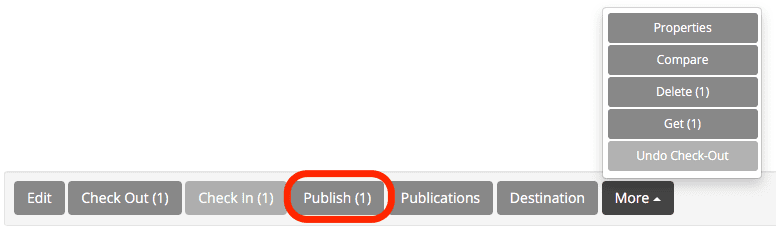
You can work with a file by clicking on the file and highlighting the file within the file list. Please note you can select multiple files at the same time (grey background) so should you wish to check out / in or publish multiple files you can click on multiples files and then select the action you wish to apply.

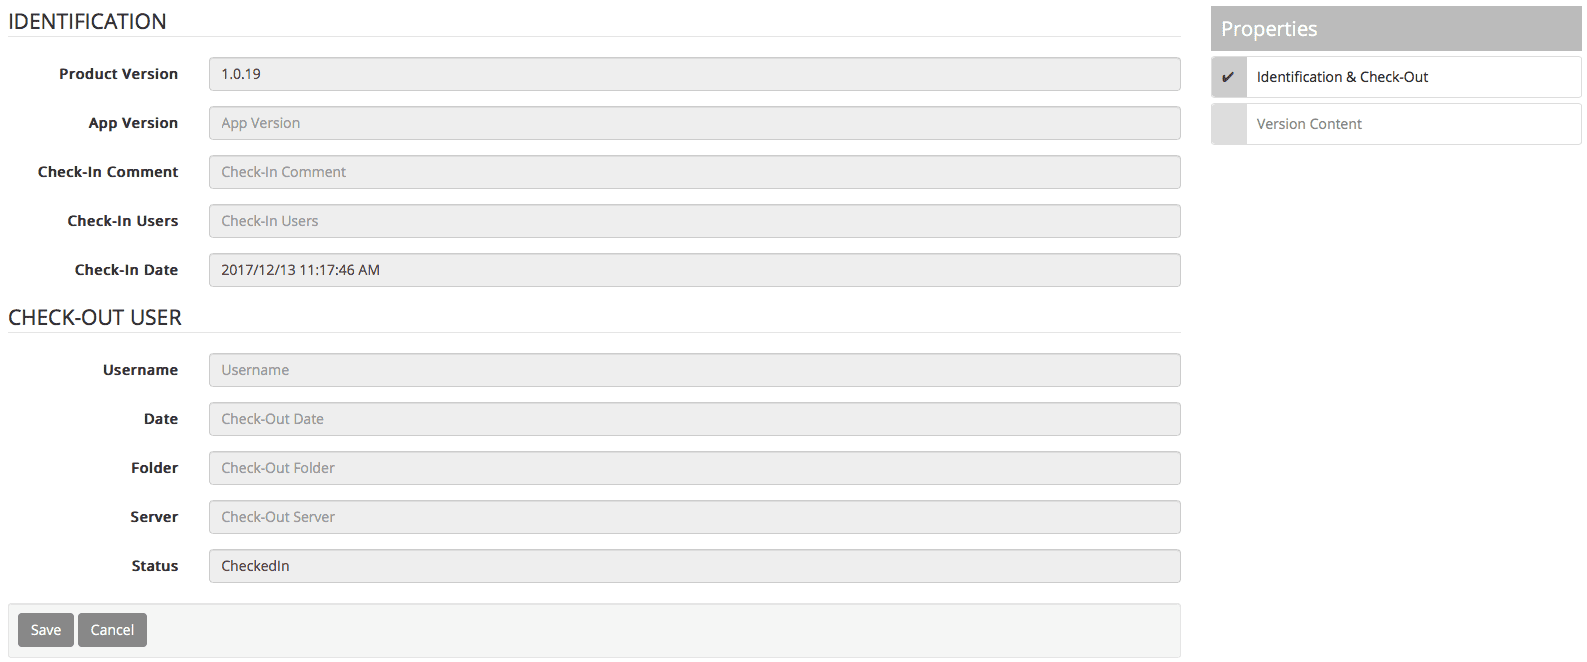
Selecting a file and clicking on the Edit button will bring up the selected file’s properties view.
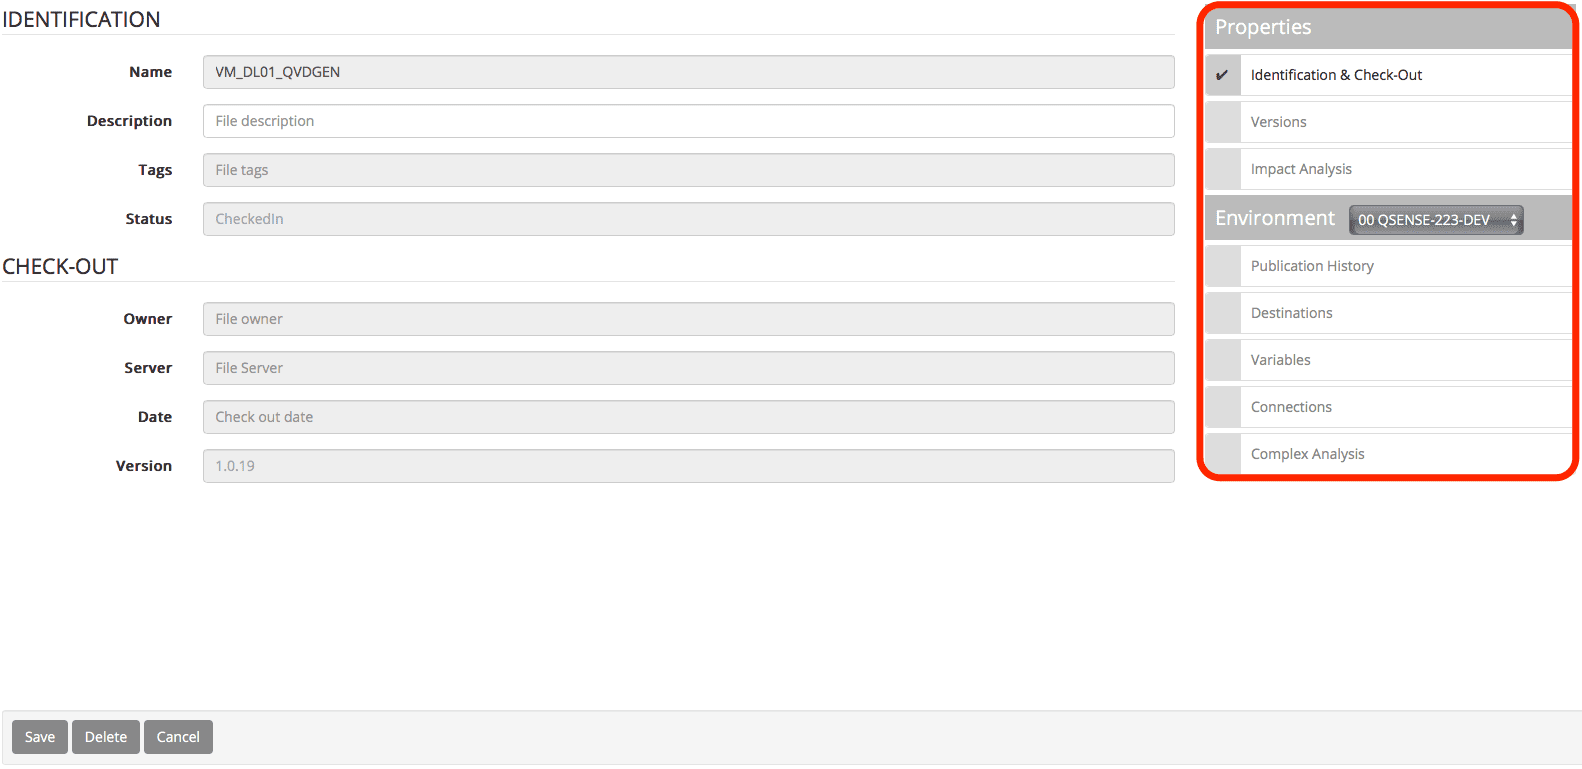
The main window will provide the Identification information and check-out information about the file.
Please note: The specific file version properties provides the same action buttons you have on a file level so every action you perform will be performed on that specific version of a file not master file that is managed in the WIP repository. See Edit File section for a description of the action buttons.
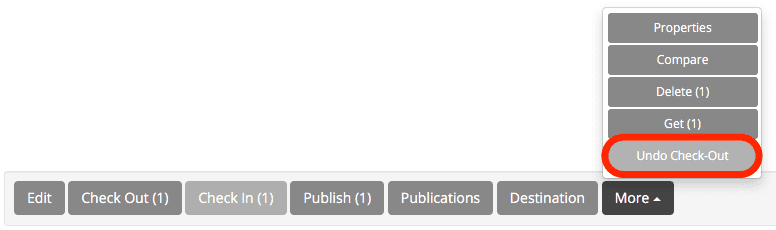
Edit
Delete
Get
Check In and Check-Out
Undo Check-Out
Publish
Compare
Cancel
The versions section of a file will provide you with all the historical version of the file within the WIP repository
Selecting a specific version of the file provides the Edit option
Clicking on the Edit option will open that specific version’s properties where the user can review the version properties and version content (see compare) of the specific version
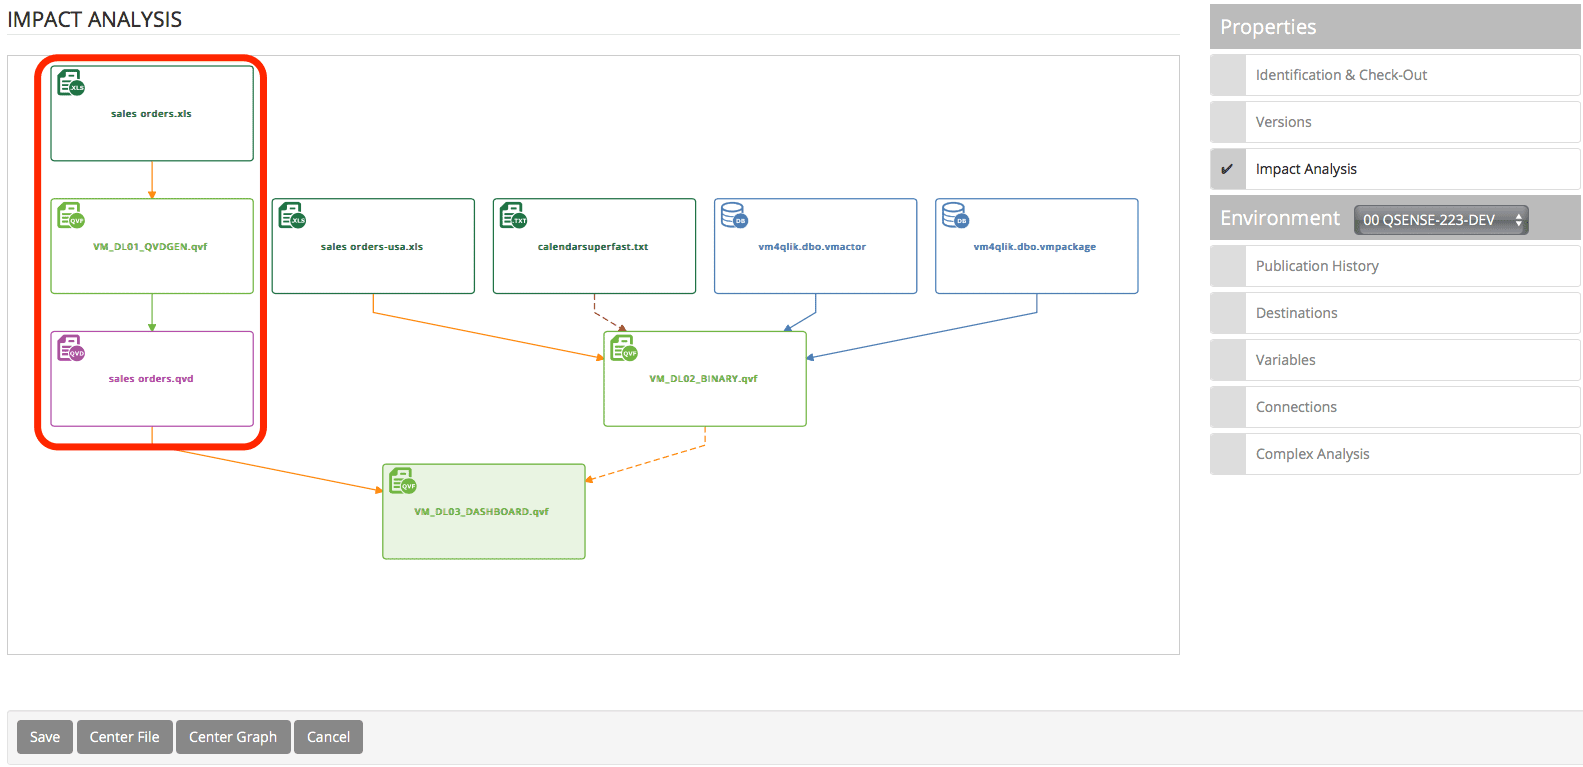
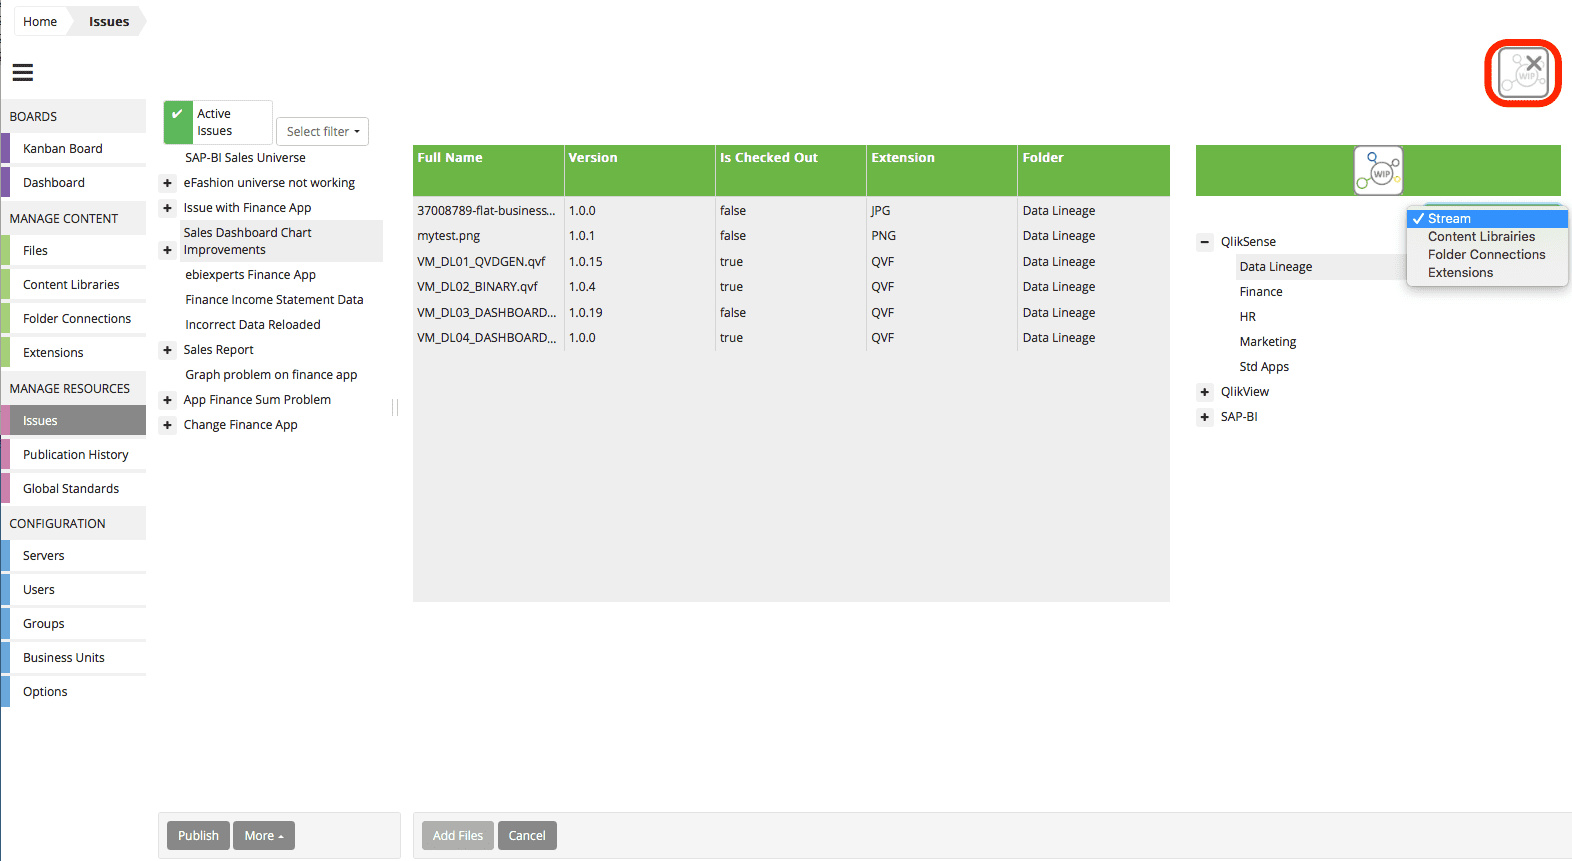
The impact analysis provides a view of both the file impact analysis as well as the data lineage of the file
The Impact analysis view if dynamic so the user can click on the active (input/output) file to view where this file is being utilized and or an input / output for other files
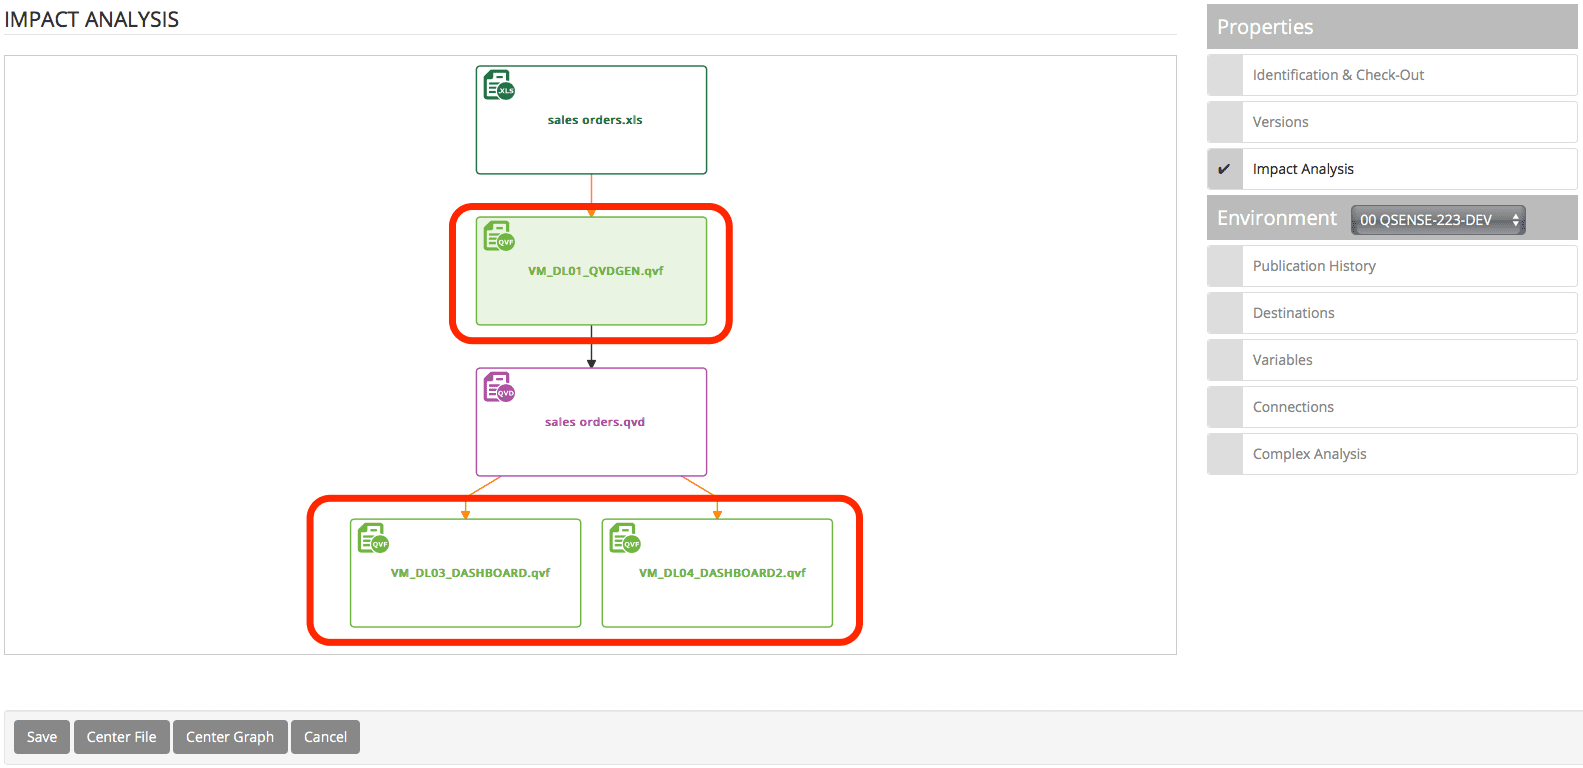
As an example: Clicking on VM_DL03_DASHBOARD.qvf in the image below will take me to the impact analysis view of where this .qvf file gets it’s data and it’s data’s source view.
In this view we can now see that Sales orders.qvd is actually generated from sales orders.xls which loads the VM_DL01_QVDGEN.qvf which is a .qvd generator which then generates the sales orders.qvd file.
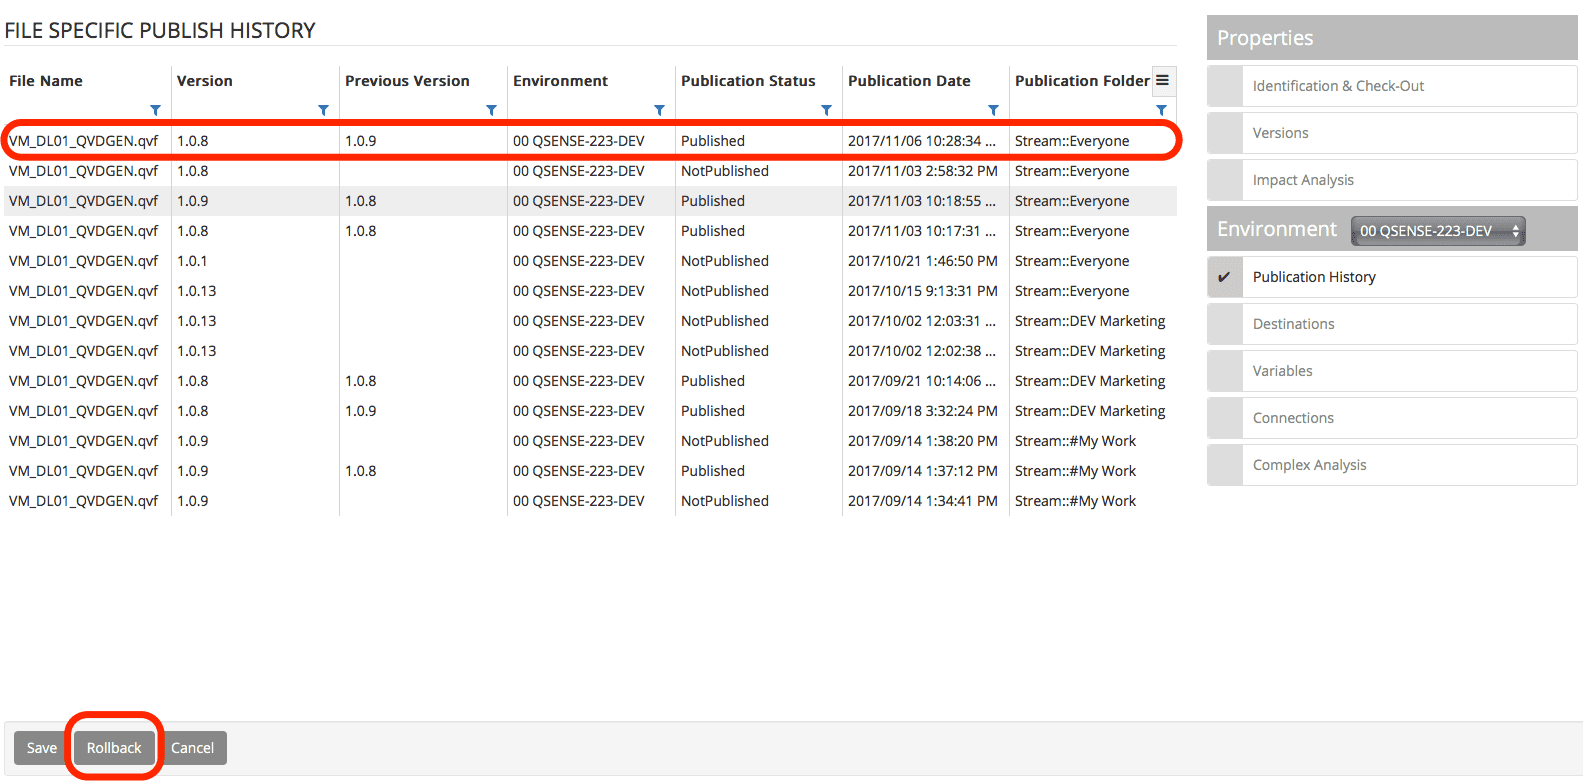
Publication History of a file will show a view of every version of the file and where that version which environment that version was published into.
You can select the Environment you wish to view from the provided dropdown list of environments. Changing the environment from the dropdown list will show that file’s publication history for the selected environment.
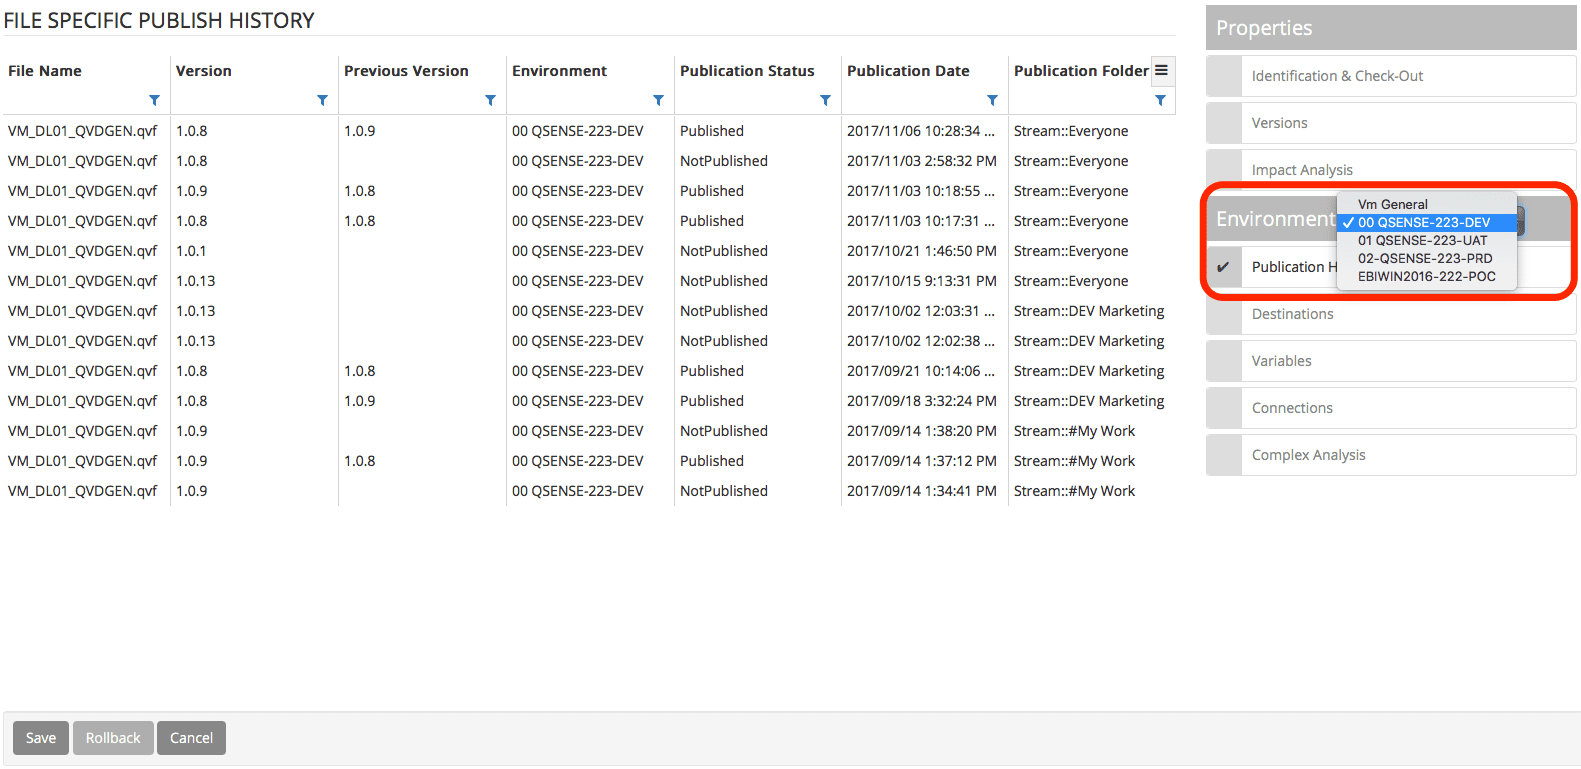
You can select a file from the list and click on the Rollback button which will rollback the file to the previous version of the file that was published into that specific environment.
This feature is very handy should you publish a file into an environment and the file is not working anymore so some or other reason. You can rollback to the previous working version of the file while you fix the problem in the latest version.
In the image below you can see we have replaced version 1.0.9 of the file with version 1.0.8 of the file so the latest version of the file in the environment is 1.0.8
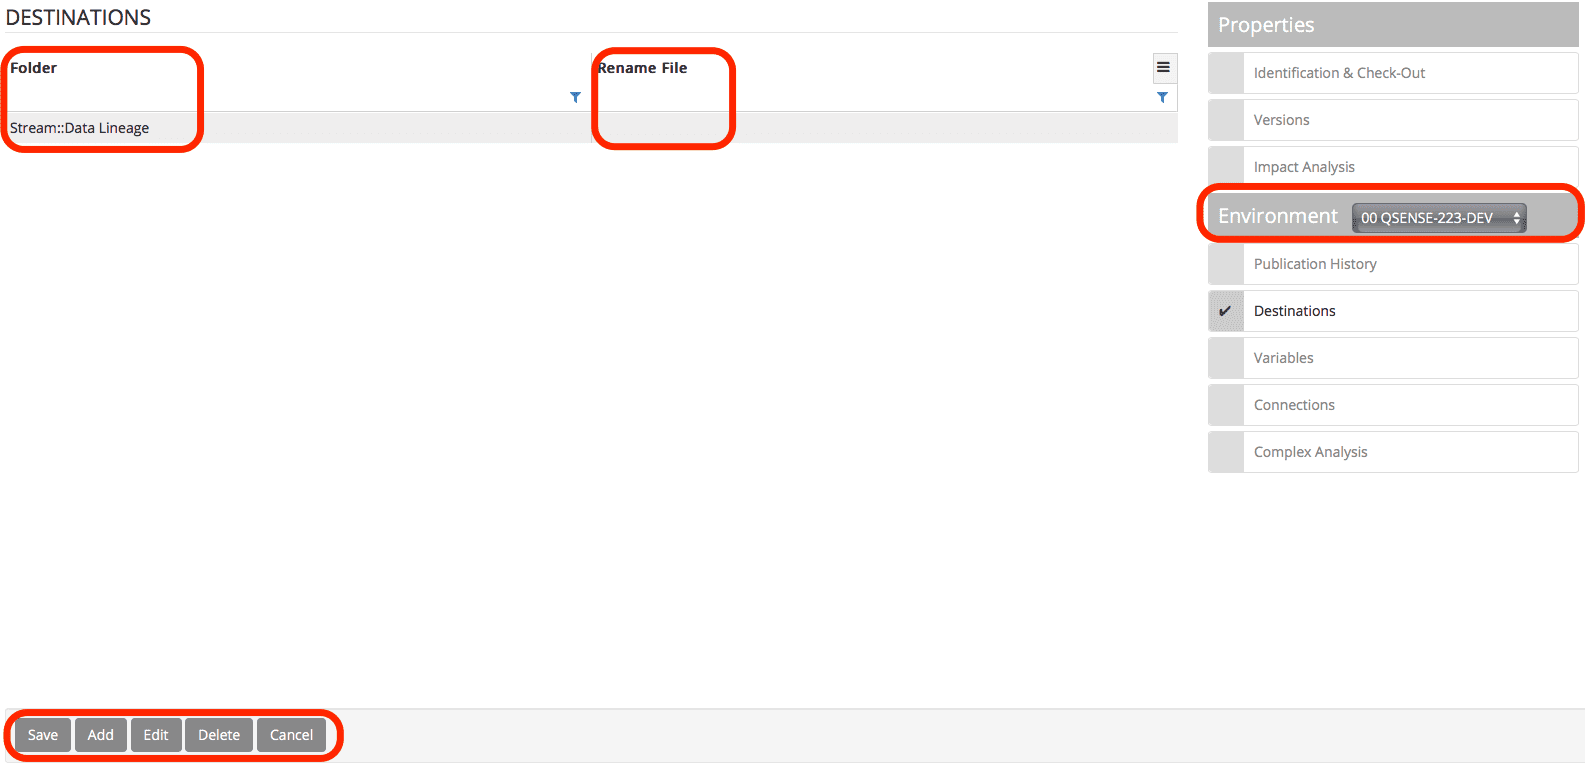
The destinations of a file are the destination of the file you pre-set when a file is check-out or published to the selected environment. This will override the destination settings of the folder
This feature is very useful for administrators of environments to ensure that the files not exposed to areas they should not be in for governance and security reasons
The Destinations options enable the user to add multiple destinations per environment or edit existing destinations or delete destinations
You can rename the file when you publish to an environment, so that the file has a different name within the destination folder/stream you have selected
File level variables enable the user to assign variables and environment wise value to the file or link globally defined variables to the file, when a file is checked-out or published to an environment.
Variables are useful for instance if a user wishes a file language to change based on the environment they published the file into they can define the file language for that environment as a variable and when users access the file from that environment the default language will be the variable language. It can be also used to define functions, paths and connections in the scripts and in the application UI
To set an value for a certain environment, first select the environment on the right, then double-click on the “Environment Value” and set that value. The value will be pushed in the file after next publish or check-out

Variables can be added by clicking on the Add variable
Provide a name and variable value for the variable

Global variables can be linked by clicking on the Link button
Select the global variable you wish to assign to the file

Connection are retrieved on checkin and will be used only when publishing to create the connection if it does not exists. As WIP can’t retrieve users credentials you might need to fill the Username and Password in order the connection to be created on the destination.
Folder Connections are defined on a global or local file level
See Folder Connections section for a detailed description of Connections
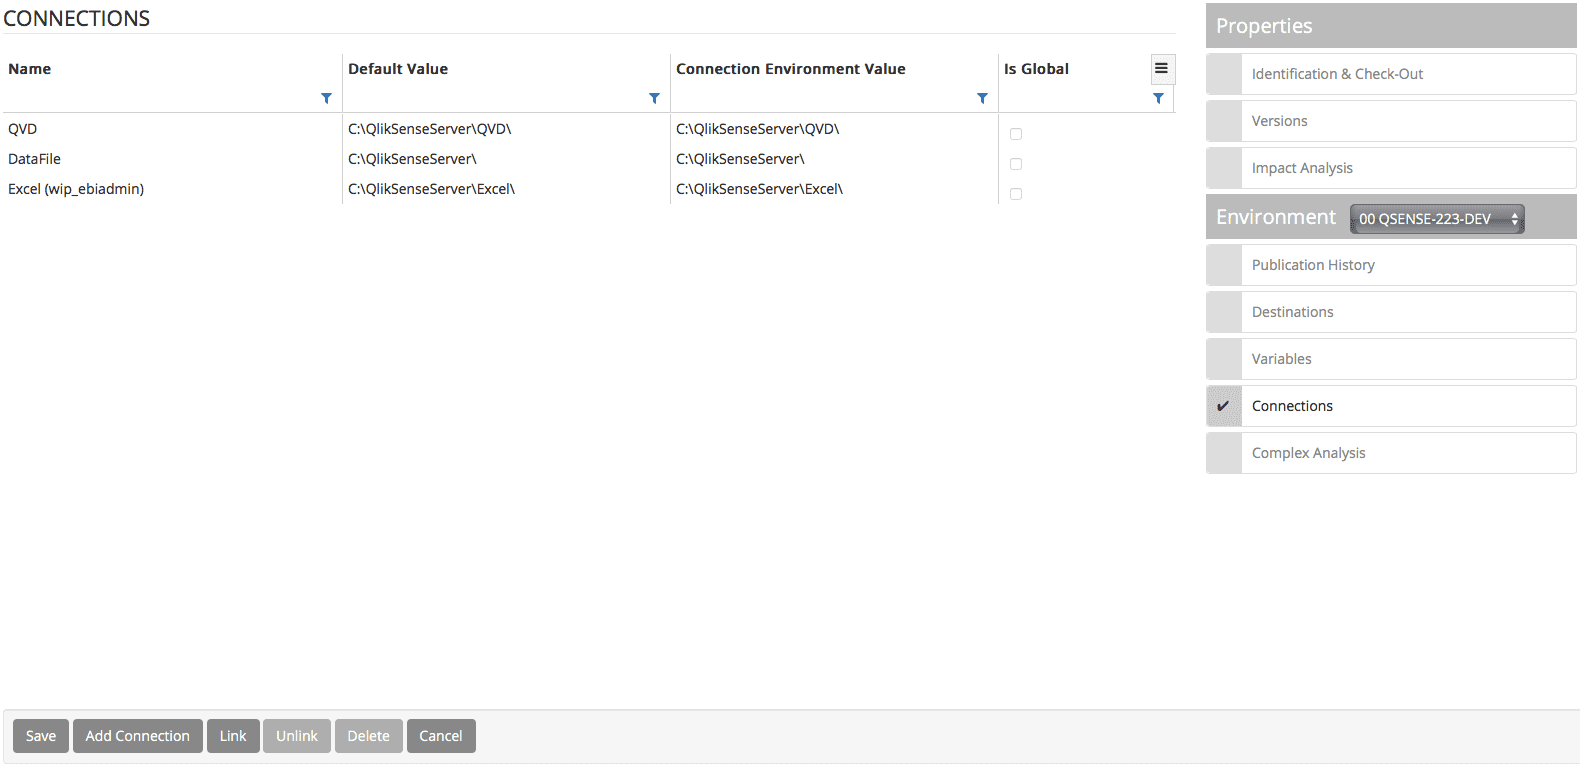
You can create new connections by clicking on the Add Connections button
You can Link global folder connections to the file by selecting the Link button.
You can unlink global connections by selecting the connection and clicking the unlink button
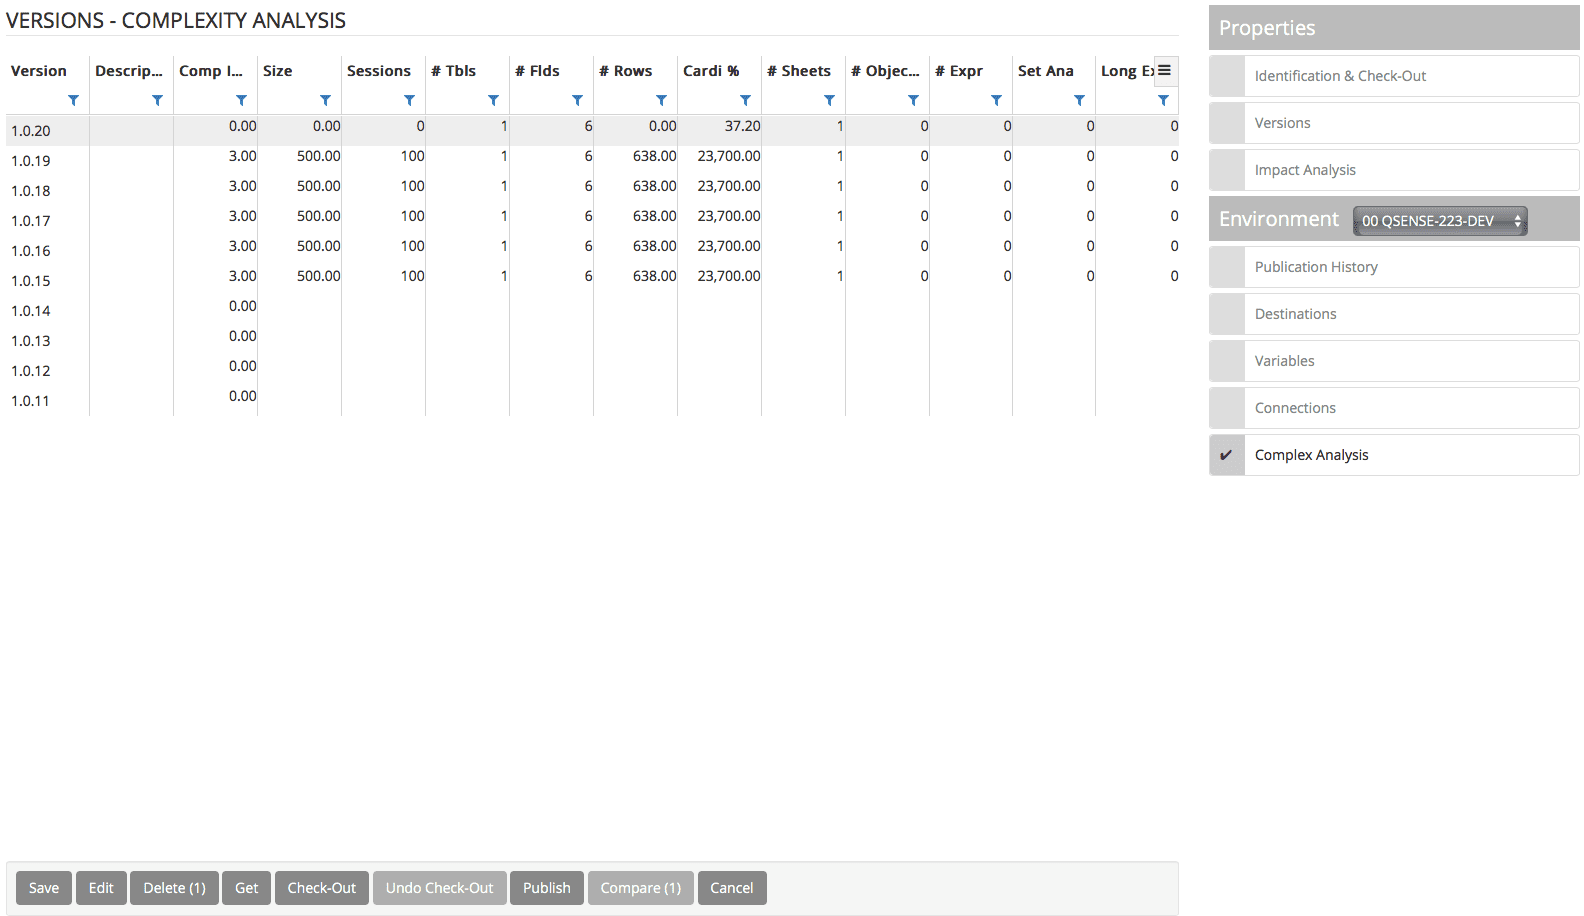
You can review the complexity analysis across different file versions within the complexity analysis view on a file level.
The complexity analysis provides you with a view of all the different categories that influence the complexity of a file and the score, percentage or value of the specific category for the file.
This view is useful to see when you are in the process of optimizing your application or you wish to see why an application suddenly does not perform well within an environment.
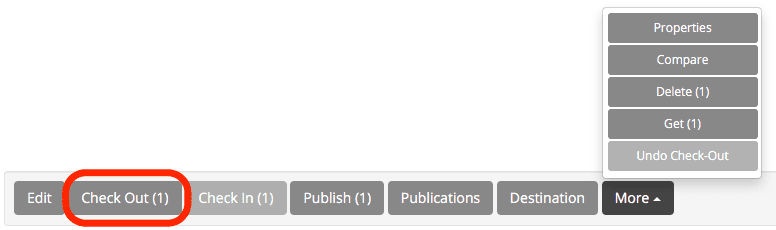
Selecting a file and clicking the Check-Out button will automatically check-out the application or file to the destination defined for the file and add the check-out metadata to the checked out version (lock and owner)
Multiple Check-Out Developers (Contributors)
WIP for Qlik Sense development process
Contribute (Multiple Developers) : if checked-out by another user, it will add you as a contributor and you will be able to work 2 people on the same application.
Qlik does not provide conflict resolution so users should coordinate where they work on the file to not work on the same back/front end i.e. 1st user edits script, 2nd user edits visualizations.
Original User check-out the file
Contribute User check-out the same file
Both performs the work on a single instance in Qlik
Either user ends their session: One user Check-In the file
WIP creates a version of all changes in the Qlik session for that version
2nd/3rd User Check-In
Last user ends the session: WIP creates a version of all changes in the session - final changed version
All users can compare the versions for verification of changes (comparison view)
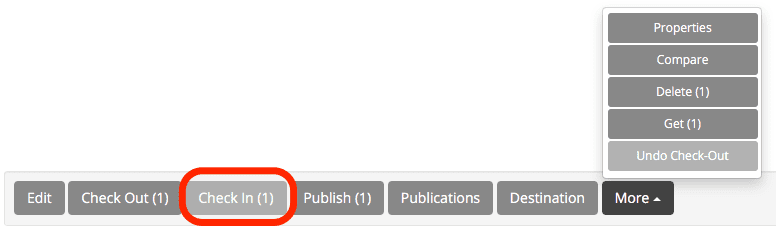
Selecting a file and clicking the Check-In button (should this file be checked-out) will bring up the file check-in form
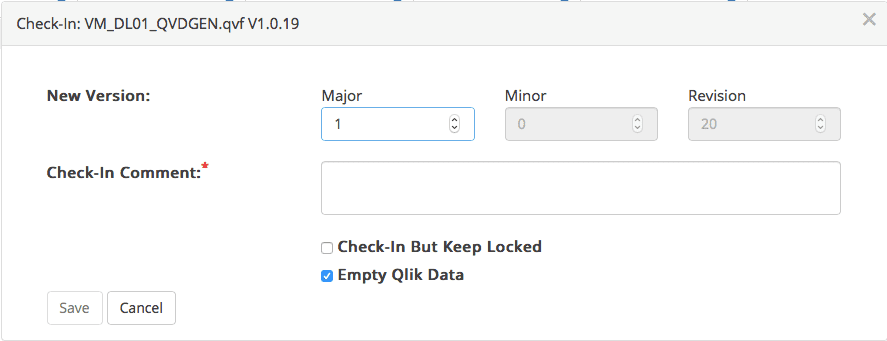
The check in form requires that you add a Check-In Comment to the version you are checking-in. The comment allows other users to follow what changes you have applied to the version
Version Numbers are automatically assigned. You can change the major version number but the Minor and Revision numbers are automatically assigned to the version
Check-In But Keep Locked enables you to check in the file but keep it locked for editing by other users. This is generally used when you are in UAT process with a business/testing user and you don’t wish other developers to change the file while you are in testing phase
Empty Qlik Data is automatically ticked as some files could be very large and there is no benefit of bringing all the file data into the WIP repository unless you are weary of the source system and / or there is no time for a reload when the file has been published. Disable global option Enable “Check-in with Data” will automatically check and lock the option preventing any user to check-in any app with data
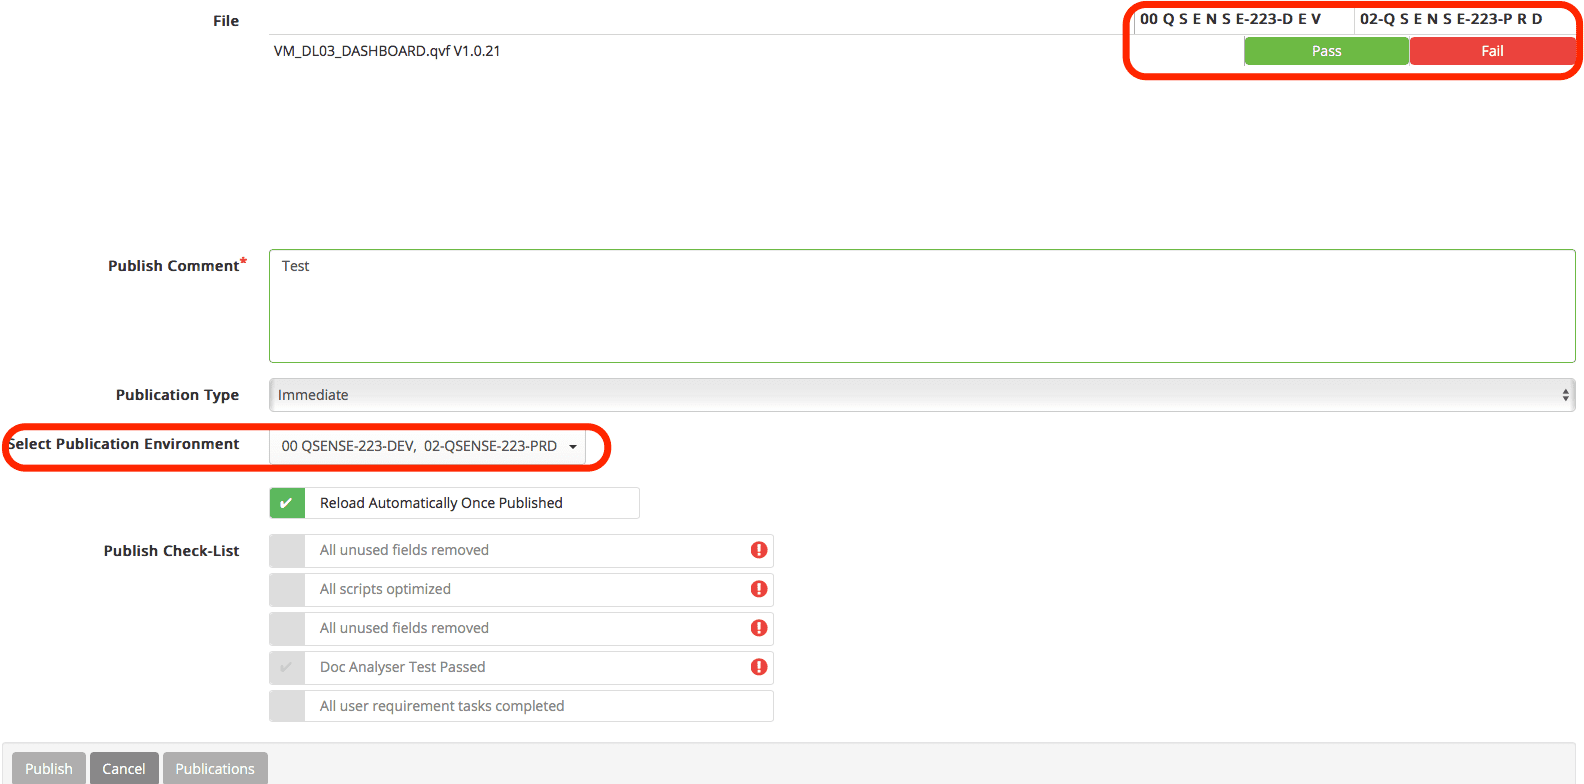
Selecting one or multiple files and clicking on the Publish button will take you to the file publication form.
The default form will show you the File Name, publish comment, publication type, publication environment and reload automatically options.

The publish comment is a required field and adds information to the publication for other users to better understand what has changed in the file published from the previous file published.
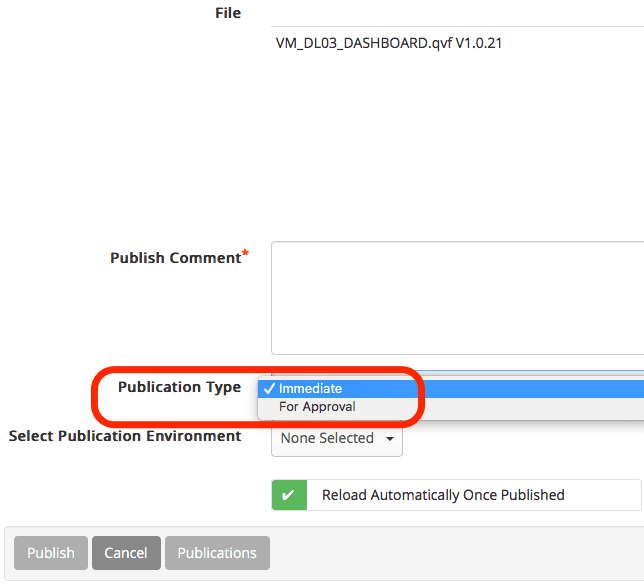
The publication type provides two options for publishing your file, Should you have the rights to publish you will be presented with this options
Immediate: Publishes the file to the selected environment(s) immediately
Scheduled: Publishes the file to the selected environment(s) at the scheduled time
For Approval: Does not publish the file but sends a request to the administrator/Release manager users to publish the file. Note that is you have only “publish for approval” right on one of the selected environments then you will only be able to publish for approval, not immediately.
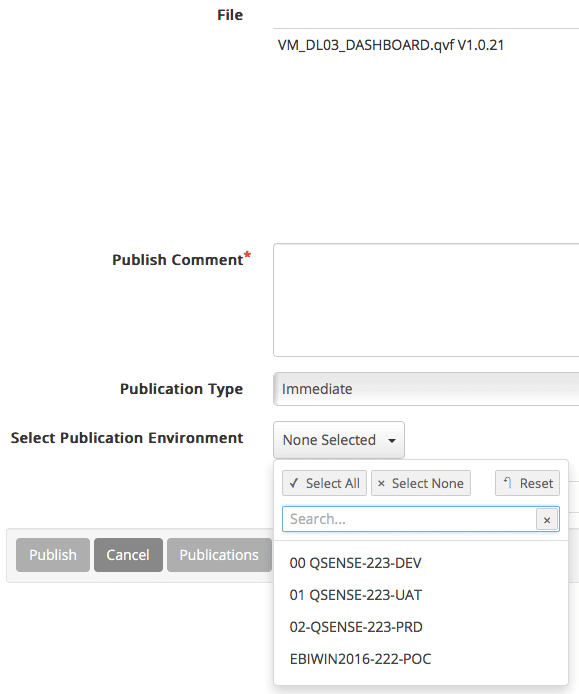
Clicking on the select publication environment will bring up all the possible environments the user is able to publish into.
You can select one or multiple environments to publish into at the same time
Selecting an environment will bring up the environment checklist as well as the complexity analysis view for the environment
Click on the select publication type and select as scheduled
It will bring up all the possible environments the user is able to publish into.
You can select one or multiple environments to publish into at the same time
Selecting an environment will bring up the environment checklist as well as the complexity analysis view for the environment
Select the Business Unit add comments and click on Publish

Click on the select publication type and select as For Approval
It will bring up all the possible environments the user is able to publish into.
You can select one or multiple environments to publish into at the same time
Selecting an environment will bring up the environment checklist as well as the complexity analysis view for the environment
Select the Business Unit add comments and click on Publish
Go to to Dashboard , select the business unit and check the task appears.
NOTE: As admin user is also a release manager, he will also be allowed to follow the steps above and approve the Pending publication
Login as User having release manager role to the selected Business unit.
Go to to Dashboard , select the business unit and check the task created above should appear under section Pending publication.
Click on the hyperlink, verify the details displayed are correct and click on publish
NOTE2: If a user is part of the Business unit but not the release manager, he will be able to view his pending publications for the selected Business unit

Login as User having release manager role to the selected Business unit.
Go to to Dashboard , select the business unit and check the task created above should appear under section Pending publication.
Click on the green cross button for cancel publication.

Qlik Sense
Unchecked: data from the current application is retained
Checked: WIP creates and launches a reload task (“WIP Manually triggered reload of <appname>“) to reload the data
QlikView
Unchecked: data from the current application is lost
Checked and QlikView publisher defined in the server definition : WIP creates and launches a reload task to reload the data
Checked and no publisher defined : a 3 minutes WIP reload is trigered, only set it for small apps and for development.
The environment checklist if defined per environment and has optional and required checks per environment that should be fulfilled and checked by the developer/publisher or they will not be able to publish the application into that environment
Selecting multiple environments will bring up the checklists for all selected environments
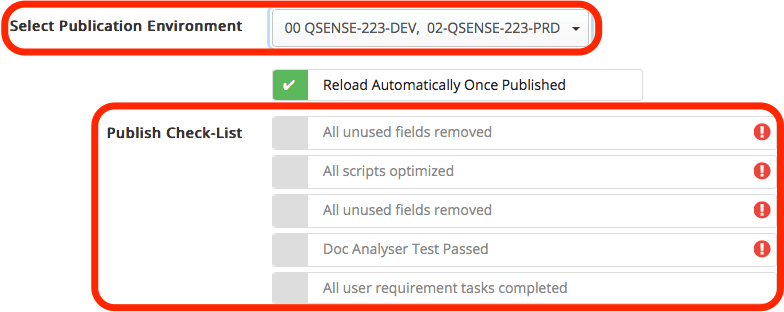
of the file compared to the index threshold set for that environment and will return a pass or fail view per environment selected. This will help the user identify whether his file will be allowed to be published into the environment or not.
Should you have a file that fails the environment complexity analysis threshold you can click on the Fail message to review the reason your file has failed i.e. in the example image below the Cardinality of the data threshold is to high for the 02-QSENSE-223-PRD environment

Should you have a file that fails the environment complexity analysis threshold WIP will enquire whether you wish to request dispensation from the Administrator users in order to publish the file. This means that the request will go to Admin users and they will be able to publish the file should they approve the publication of the file to the specific environment.
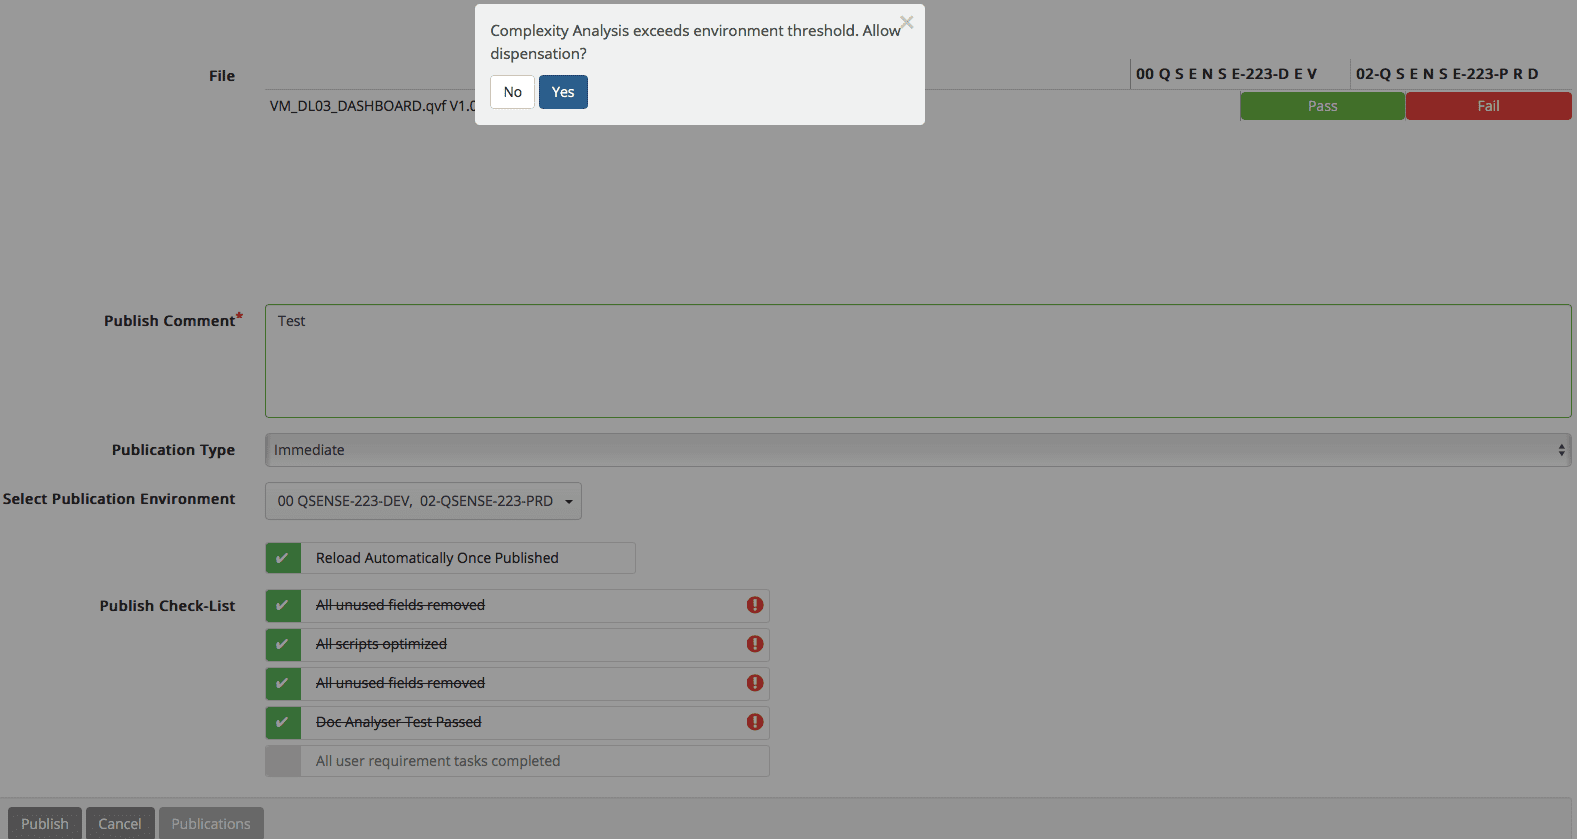
Should you meet all the publication requirements your file will now be published into the environment(s) selected and can be automatically reloaded once published into the environment.
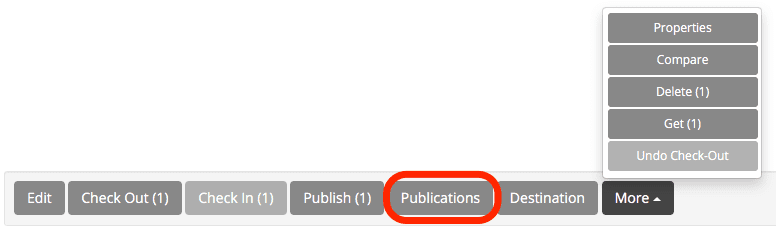
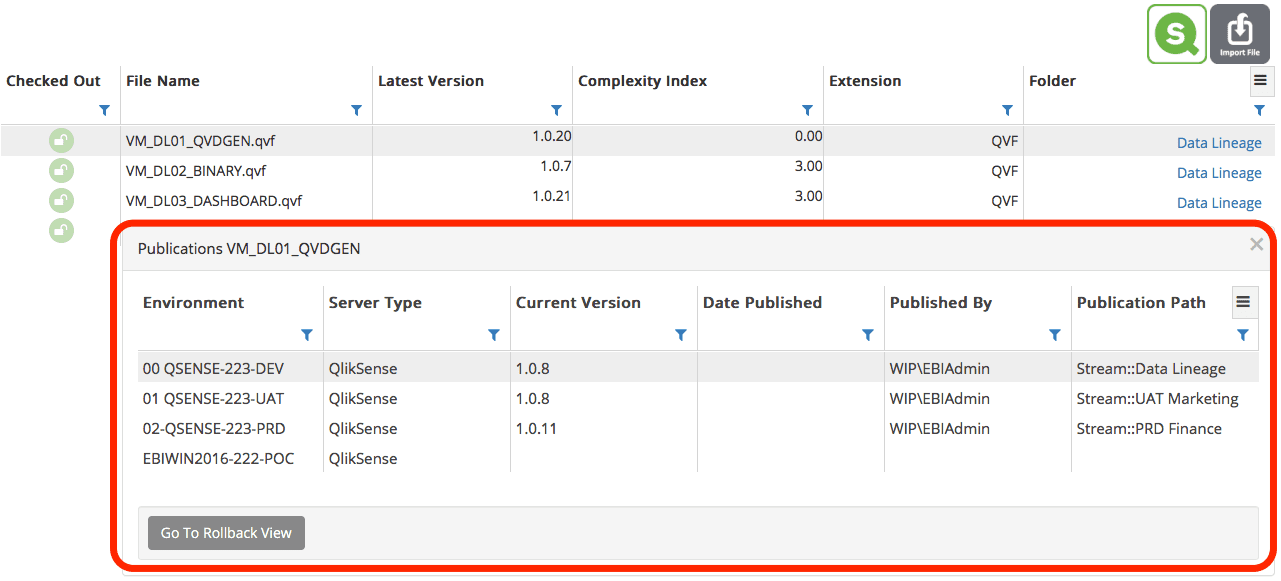
Selecting a file and clicking the publish button will bring up the publications view for that specific file
The publications view of the file will show you the latest version of the file across all environments as well as who published it and what the publication path for the file within that environment is i.e. which stream or folder it is published to in that environment.
The publications view also provides a button that will take you to the Rollback view in the publication history of the file, should you wish to rollback the file within a certain environment.
Deselect all files and press “Destination” to get “Package Destination” (not file destination) then select the destination for the environment
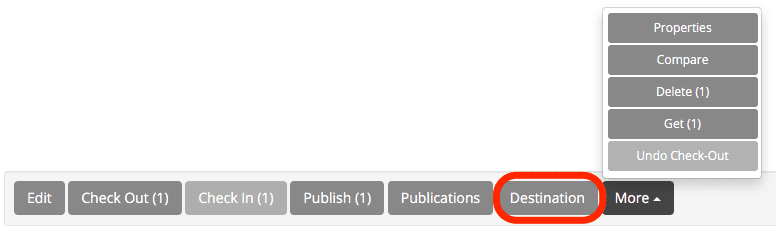
The destinations view provides a view of the package destinations when it is checked out or published across the different environments.

Destination Prov: The provenance of the destination, it can be:
Envi : destination is defined in the environment itself. For universes default it’s the root universe for files the “Public Folders”
Current Package: the destination is set in the selected folder
Inh Package: the destination is inherited from a parent folder
Edit : see Edit Destination
Reset : only available if Destination Prov = “Cur Package” will remove the selected package destination and inherits from its parent or environment
Will display the server browser to edit the destination

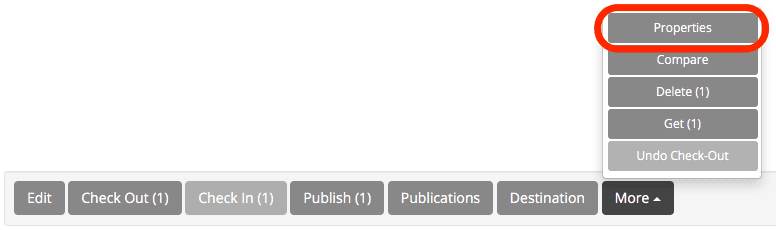
Clicking on the file properties button will bring up the standard file properties view and alternative Version Content view.
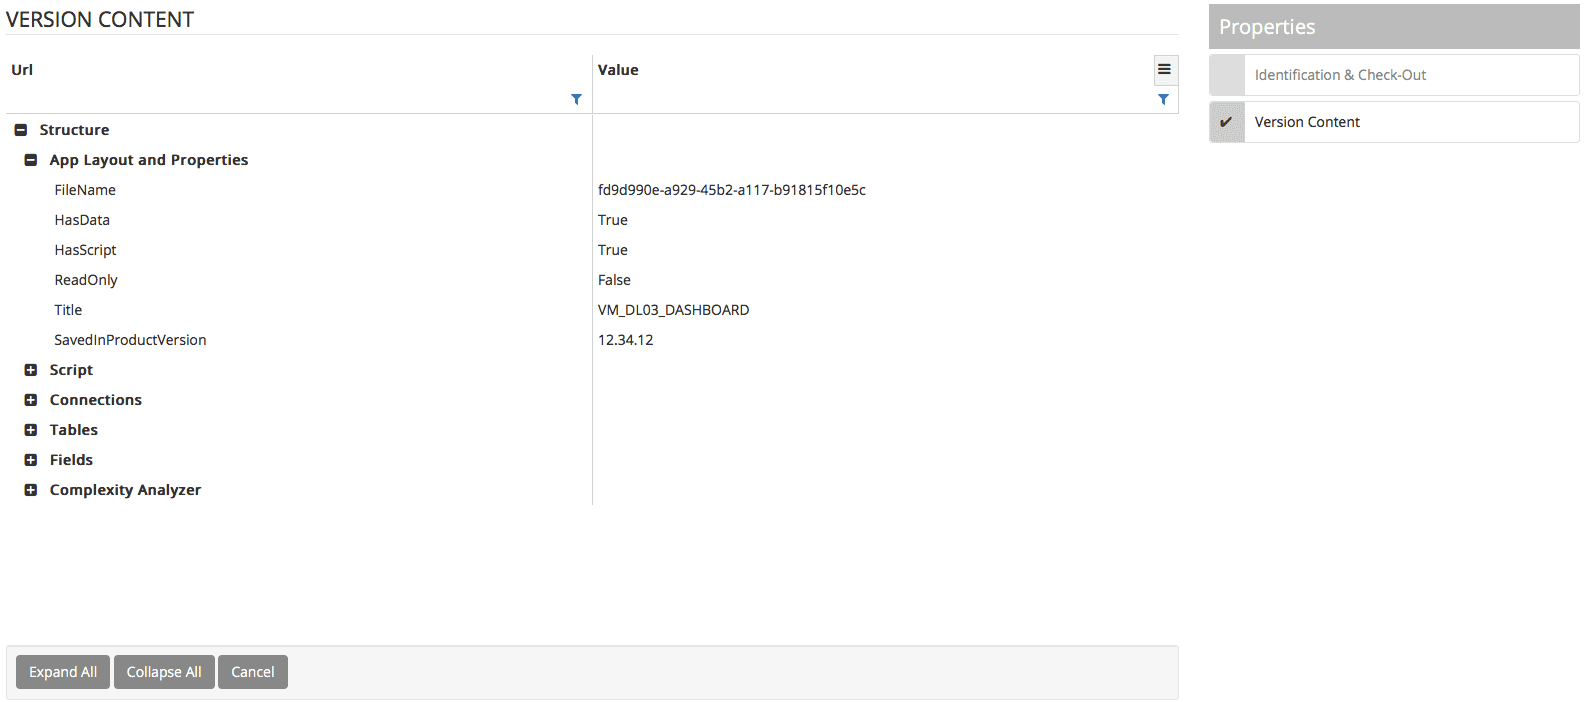
The Version Content view provides you with a hierarchical structure view and values of all the metadata about your file. You can expand all or collapse all be clicking on the buttons provided.
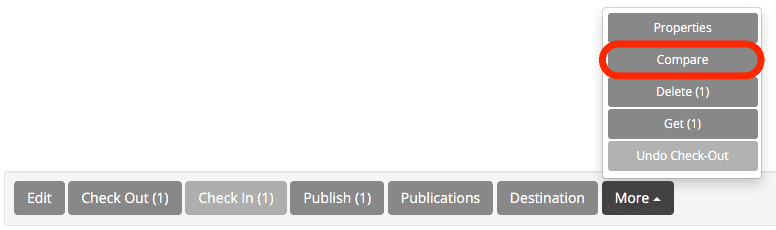
Selecting multiple versions will provide the Compare option which will enable the user to compare two versions of the same file to one another
There are two ways to compare your files
Selecting the Compare function from the file level will automatically compare the latest version of the file with the previous version of the file. The comparison will provide you with a hierarchical view of the structure and value of the previous version of the file on the left and the comparative view of the latest version on the right and will compare all changes on every line of metadata
Editing a file and going to the versions section of the file and then selecting two different versions of the file will provide you with a comparison of two specifically selected version of the file
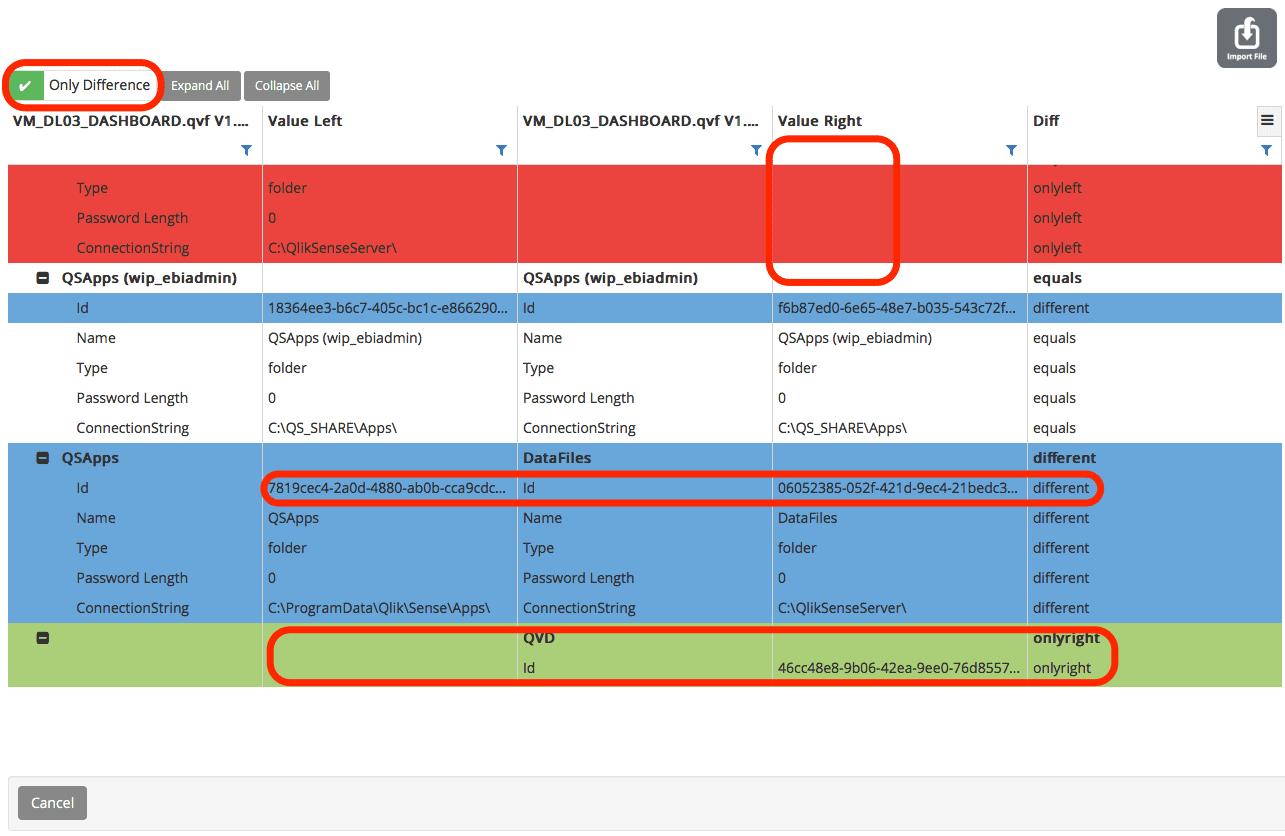
Selecting the Only Difference option will show you only the differences of changes between the applications
Change Colour Codes:
Red: Red means that something has been deleted from the previous version of the file
Blue: Blue means that something has changed from the previous version of the file
Green: Green means that something has been added to the latest comparable version of the file vs. the previous version being reviewed
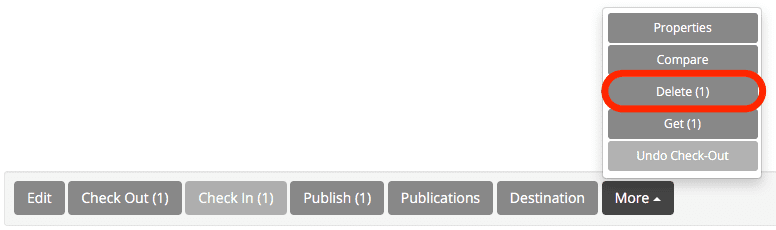
Selecting a version and clicking the delete button will delete that file or file version from the repository
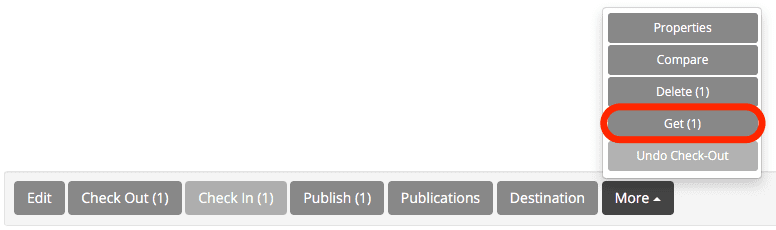
Selecting a version clicking the Get button will Get a copy of the file but not check the file out of the repository
You can undo a checkout should you wish to ignore any changes made to the file within the checked-out stream/folder.
You can access the files within your product (Qlik Sense, QlikView, NPrinting, SAP, …) server by browsing the product server.
Here is an example of the Qlik Sense Server button
Here is an example of the QlikView Server button
Same for NPrinting and SAP Server …
The server browser will change based on the product you have logged into. I.e. logging into Qlik Sense will browse your defined Qlik Sense Servers.
By clicking the Servers button, you can browse the servers folder/stream files
Please Note: The product icon you used to browse the servers will turn grey with a x cross on it. You can click on this icon to close the server browser window.
Direct check-in will import the selected files directly inside the destination folder.
Hierarchical Check-in will replicate the folder structure in the Destination Folder
Direct check-in will import the selected files directly inside the destination folder.
Hierarchical Check-in will replicate the folder structure in the Destination Folder

You can browse your product files and drag/drop them into the selected WIP destination folder. Performing this action will automatically check the file into the WIP repository.
Select a WIP destination folder you wish your file to be checked into, open the API product browser, select a folder and then select the needed files then click on the left Check-In button.
Note: Drag/Drop can add only one file at a time when Check-In can add multiple ones

Select All | *.xxx
Use this selectors to select all, or a specific extension
Select the destination folder
Open the server browser
Select a server then a folder/stream
Press the right Check-in button, WIP will list all files in the server folder/stream in the central window with they relative path (starting from the folder you have selected).
Select the needed files
Press the Left Check-In button
WIP will check-in and replicate the folder hierarchy and files
The content libraries are integrated to the Qlik Sense API and will connect to the Qlik Sense Content libraries stream. Content library files can be managed in the same way as all other files are managed through check-in/out and publication processes.
To browse your Qlik server click on the QlikView / Qlik Sense Icons or access other files through by clicking on the Import File icon.

You have two types of connections in Qlik.
Connections insure that your connections to your various data sources always work within the environment you are publishing your applications into. WIP will automatically update the connection based on the environment published.
Data Connections
Data connections are set up on an application level and can be various types of connections. Data connections are set up on an application level so you can connect to many different data stores and data types via your application.
WIP also manages your data connections on the file level thus you can access your file data connections from the file properties.
Additionally, to file level connections you can also set up global connections that will be accessible for all files.
To browse your Qlik server click on the QlikView / Qlik Sense Icons or access other files through by clicking on the Import File icon.
Folder Connections
Folder connections are utilized for your “LIB” folder connection content. You can manage the files in your folder library connection within WIP and any updates on the files will then be migrated to your server as published from time to time.
Folder connections are integrated to your Qlik Connections via the API. When you connect to your Qlik server it will automatically display all your content in your Qlik Connections via the API connection to your Qlik Server. You can now drag/drop your various connections, includes, files etc. into the WIP repository folder of choice.
To browse your Qlik server click on the QlikView / Qlik Sense Icons or access other files through by clicking on the Import File icon.

Qlik supports many different types of extensions. Extensions can be several different things: A widget library, a mashup, a custom theme, or a visualization extension to visualized data such as an interactive map.
WIP integrates to your Qlik Sense server and accesses your extension libraries. You can drag/drop extensions into the WIP repository and manage them accordingly. WIP will manage your extensions in the same way that it manages a file.
WIP can explore and compare the extensions contents and manage dependencies between apps and extensions.
To browse your Qlik server click on the QlikView / Qlik Sense Icons or access other files through by clicking on the Import File icon.


Publish an app having tasks
Publish a Task having apps
On 1st publish
Auto Publish and relations…
The issues list provides a list of all active issues by default. Active issues are still work in progress thus visible on the Board. Deactivating an issue will remove it from both the Board as well as the active issue list.
You are able to filter the issues based on the following criteria:
My Issues
My Issues will reflect all issues which you have been assigned to as assignee
Reported By Me
Reported By Me will reflect all issues that you have reported
Subscribed To
Subscribed To will reflect all issues that you are subscribed to as an interested party
Recently Updated
Will reflect all the recently updated issues within the last month
Ticking the Active Issues box will show you all the deactivated issues. These are issues that have been completed and should not reflect on the Board anymore. The filter will still apply on the deactivated issues list.
If you have not added any files or wish to add some additional files to your issues you are able to browse the WIP repository folder, stream, connections, content libraries and so forth.
You can browse the files by clicking on the WIP product logo as indicated in the image, and drag/drop the files into the issue or release you wish them to be added to. Linking files to issues ensure they are published accordingly when you are ready for publication.
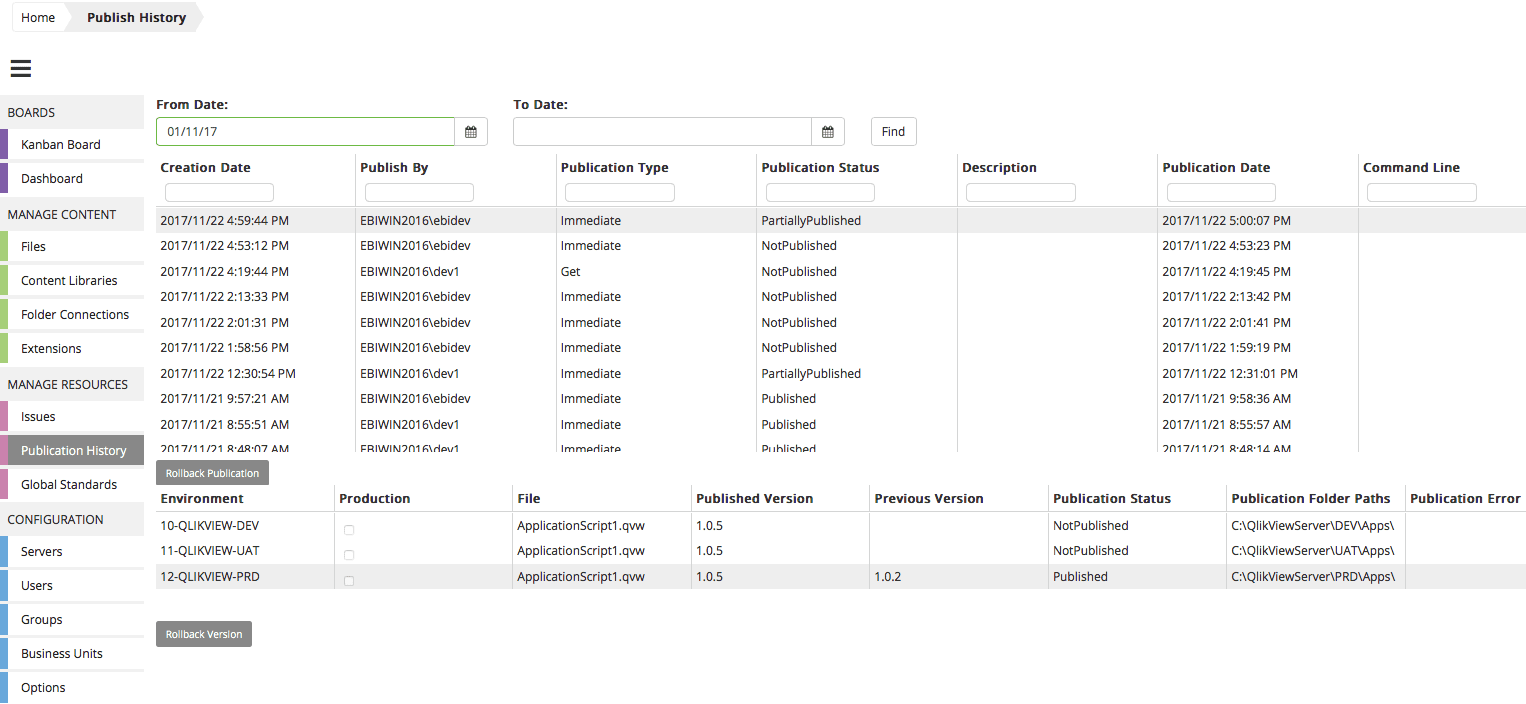
The publication history section enables you to search for publications based on a date range which can be set by selecting the From Date and To Date calendar sections and selecting the date range. Additionally you can search your publication history by creation date, publish by, publication type, publication status, description, publication date, and based on the type command line used.
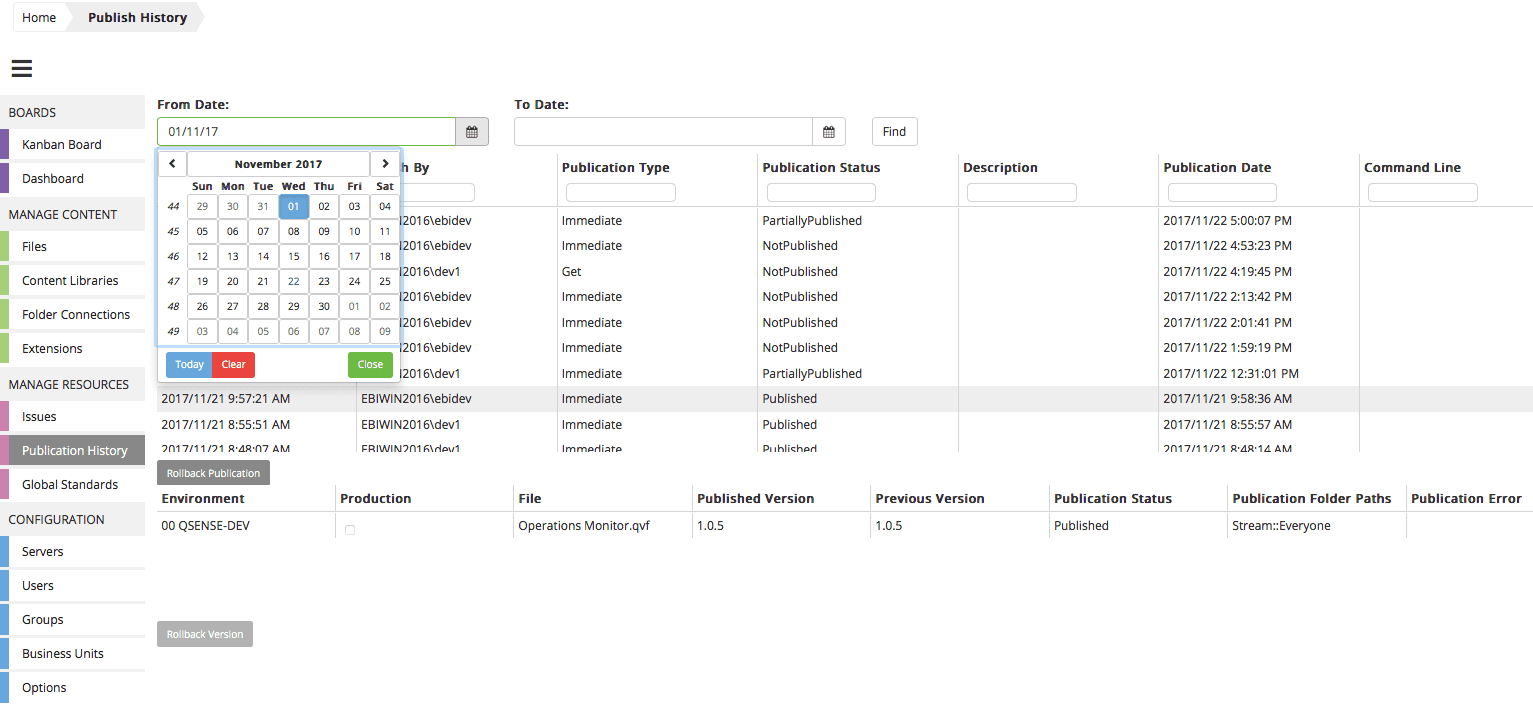
Selecting a publication will show the environment, files, published version, previous version, publication status, publication folder path, publication errors for that specific publication.
Selecting the publication will enable you to rollback the publication or a specific of a file version within the publication
Clicking on the Rollback Publication button will rollback the total publication to the previous version of all the files within the publication.
Clicking on the Rollback Version button will rollback the file you have selected to the previous version of that file within the published environment.
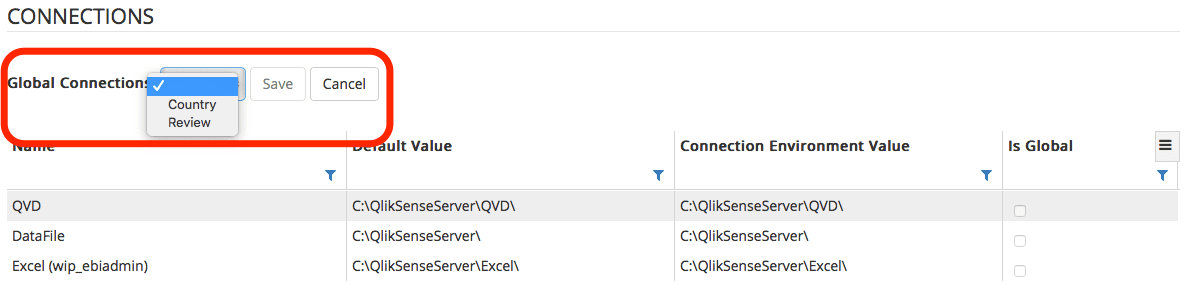
Global Variables and Global Connections can be linked to any Qlik application in your WIP repository. Common variables and connections used by your applications should be created here, as a central global standards library, for quick access from any files.
WIP enables you to create different variables and connections where the default value will be the same but different values will exist based on the environment you publish your standards into. You will thus have a central place where you can manage all your global standards.
To automatically change the value of a Variable or Connection when publishing to an environment, first select the Environments filter on the right. Note the Default Value will be replicated in the Environment Value no matter which environment you select. You need to edit the Environment Value with the Environments filter applied. Your global standards variables and connections values will automatically be applied when linked to a file.
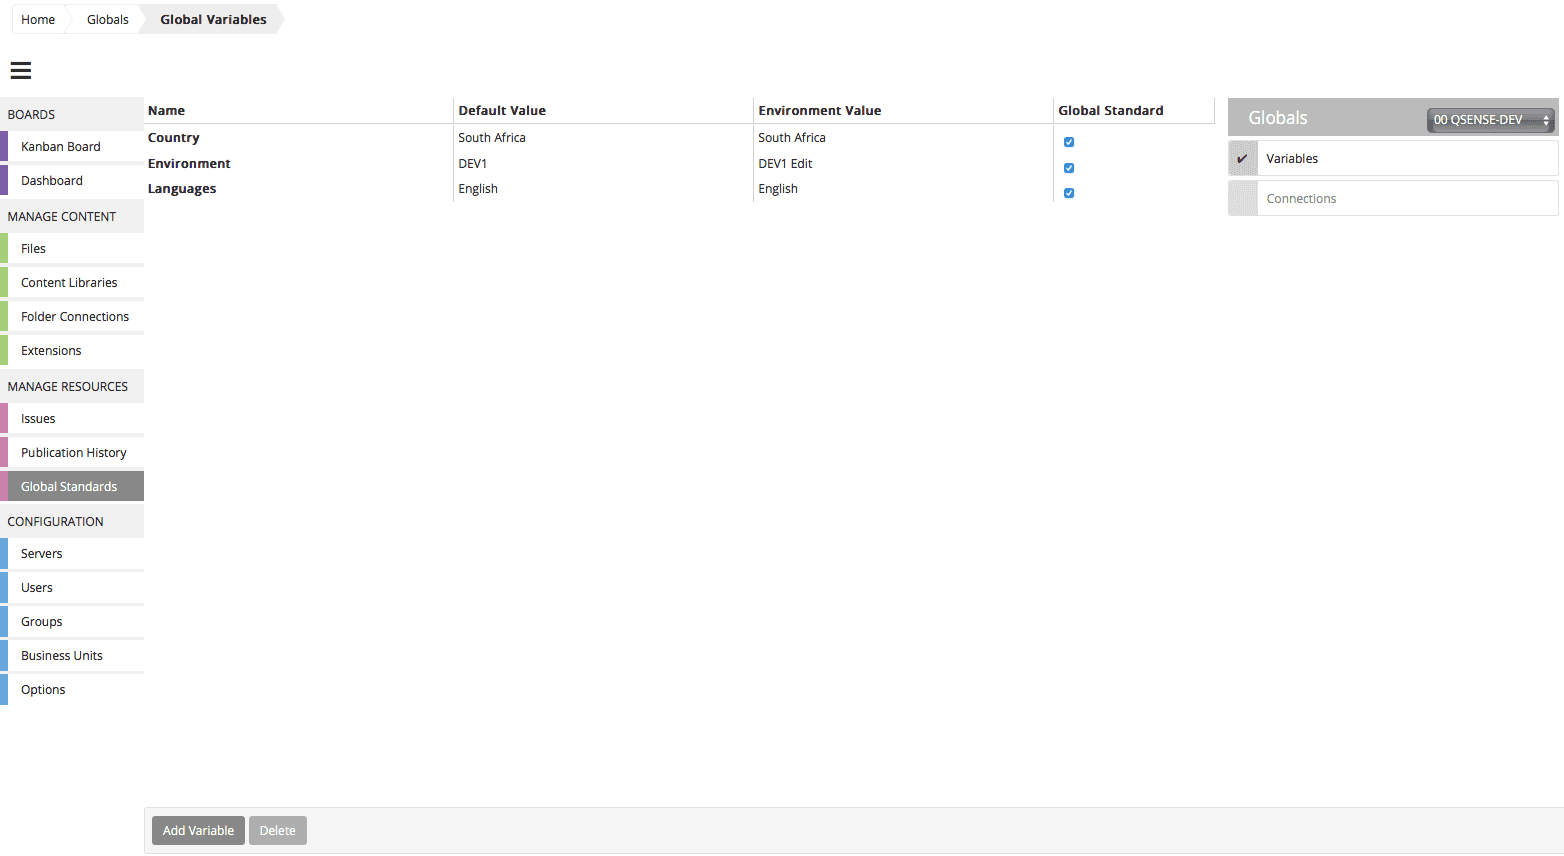
To add a variable, click on the “Add Variable” button.
You will be asked to provide a variable name and the default value for the variable – To save the variable click “Save”

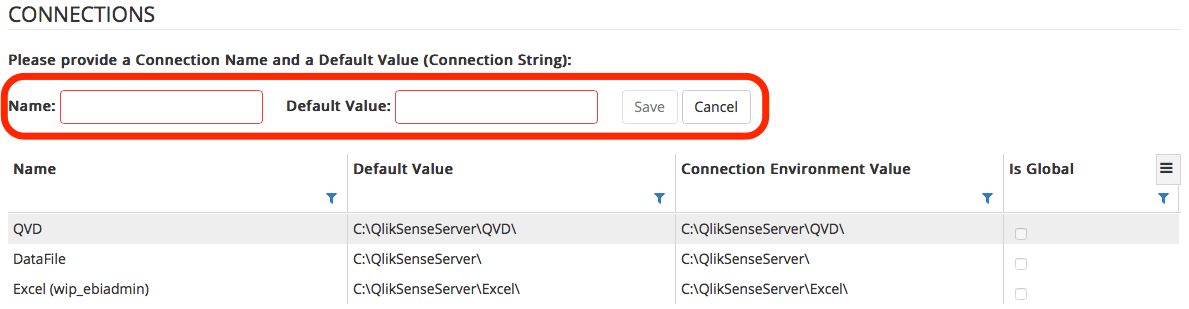
To add a Connection, click on the “Add Connection” button
You will be asked to provide a Connection name and the default value for the Connection – To save the Connection click “Save”
