
Disclaimer
No part of the Computer Software or of this Document may be reproduced or transmitted in any form or by any means, electronic or mechanical, including photocopying, recording, or by any information storage and retrieval system, without permission in writing from Ebiexperts. The information in this document is subject to change without notice.
If you find any problem with this documentation, please report it to Ebiexperts in writing at support@ebiexperts.com.
Ebiexperts does not guarantee that this document is without errors.
Configuration
Configuration: Options
The Options section is where your system wide configuration options are configured. Changing these options will apply changes throughout the system accordingly.

Landing Page : the first page displayed after login
Board
Dashboard
Collaboration
Files
Scan Level
The scan level is the level you wish to scan the applications and files when they are checked into the repository. Currently only QlikView scan level is used and level 3 is not recommended as it will take a very long time to scan and compare documents.
1 (recommended)
2
3 (not recommended)
All three scan options will scan all the available options on a file but will provide a more detailed content of the file for comparisons and version content.
Please Note: Changing the scan level to a deeper level 1-3 will require more time to check you files into and out of the repository
Allow duplicate file names
When you enable this, you are allowing users to check-in files with exactly the same name. This will mean that instead of WIP managing one unique file in the repository it will start to manage multiple files in different folders.
Please Note: Ensure you have a very strict version management structure and policies in place before disabling this on the WIP platform.
Please Note: This option can’t be reverted It’s one way
Please Note: If the option is active, adding a file that already exists in the repository will add a new version to the existing file regardless of the folder where you dropped the new file.
Tag Files
Add WIP Version To File Commentary
Disable Check-In when File is Checked-Out
Enable Check-In Only If File Is Checked-Out
Enable Check-In Of Previous Versions
Collaboration
Collaboration page on the Boards menu allows administrators to provide useful information for users such as support numbers, websites, linked content, chat groups, etc. You can have up to 4 sections on the page with each section customized here.
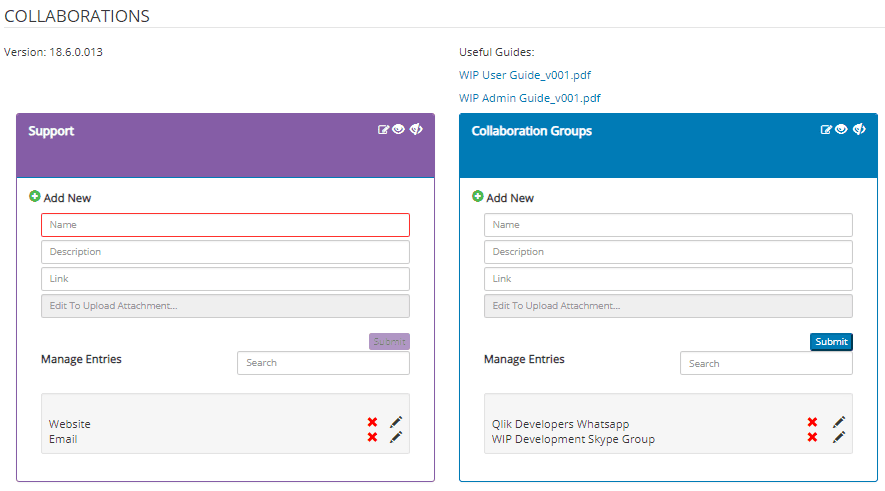
Name: Input the name of the entry
Description: A brief description of the entry
Link: Provide a link for this entry, this can be a URL, phone number, email, etc and the link will appear on the “Name”
Submit to create the entry
Attachments
Entries need to be created first before you can upload an attachment to the entry. Once the entry is created click on the edit button for the entry, this will select the entry. Click on “Edit To Upload Attachment”, this will open up the computer explorer where you can choose the file to upload, once selected it is automatically uploaded so no save is needed.
Extensions
This page shows all the possible file extensions that you are able to import into WIP and how WIP will process the file. It is recommended that you leave these configurations as default but should you wish for a file to be processed differently you can configure it here.
Double click on “Process As” for the extension to bring up the drop down, select the new extension and click Save at the bottom of the page.

License
The WIP license section enables the administrator user to paste the license code into the license area defined and to save the code. Once saved the license code will unlock the license amounts as have been defined by the code provided to the system.
The license code will unlock the Product options and number of licenses per product option. The administrator user can come to the license section to review how many of which product option has been assigned to users throughout the system. The license will also reflect the expiry date of the license. This will inform the administrator user as to when the license should be renewed.

Board
The Board configuration options enables the administrator to configure the Board . The administrator can activate various options on the Board according to the available check boxes within the activate columns. Activating these options will display these options on the Board and deactivating them will remove them from the Board this should you not have a To Do area on your current Board just deactivate the To Do option by clicking on the checkbox.
The Board status options “Column” column options will place the options within the columns as defined per status option i.e. when dragging your issues, you will find the status options within the defined columns in your Board
Email
The email configuration is where you will configure the Simple Mail Transfer Protocol (SMTP) of your WIP server. This will require that you have the necessary configuration information of your company SMTP server and have created a user for WIP to be able to send notifications from the system via email.
SMTP Server
SMTP Port
The SMTP port should be assigned as assigned to you SMTP configuration meaning this will allow WIP to access your SMTP server through the defined port. Ports number depend if the SSL option is active or not, can be 465, 587 or 80
Username
Password
From Mail Address
Enable SSL
Validate SMTP
Complexity Analyzer Index
Each Qlik Application has a Complexity Index value in the file. The complexity value of a file is a sum of several different measures of complexity of a file’s content, including number of tables, number of fields, number of sheets, objects, expressions, calculated dimensions, etc. WIP users have the option of changing the weighting factor for any of these individual complexity measures as well as setting their thresholds.
Applications that exceed the threshold of one or more attributes are probably those whose performance could be improved by reducing their complexity. Their improvement is also likely to benefit the QlikView Server performance by reducing system resource requirements.
The measures in the Complexity Indexes are:
Base is the level for factoring into the complexity index. If a file contains tables, sheets, or other objects whose counts are below the base settings, then those elements are not calculated in the complexity index. Any number that exceeds the base is used in the complexity index. For example, if the Tables Base is 5, and a file has 6 tables, then 1 would be used to calculate the complexity index.
The Max value is used as a divisor in the complexity index calculation, so the higher the Max value, the lower the impact of counts that exceed the Base.
The Weight is a multiplier in the complexity index calculation, so the higher the Weight, the greater impact of counts that exceed the Base.

Publish Workflow
Publish Workflow is on an environment level, it allows Administrators to set up the promotions between environments. All publication users have to follow the promotion path as defined here.
Default
Default options means users are able to Publish to any environment, there is no path users need to follow.

Promotion Workflow
This is where you set promotions between your environments, with all check boxes un-ticked means that users need to publish versions from DEV – UAT – PRD in that order.
DEV-PRD – if the version is in DEV, users can publish from DEV to PRD but cannot publish to UAT
NP-UAT – if the version has not been published yet, users can publish directly to UAT but not to DEV or PRD
NP-PRD – if the version has not been published yet, users can publish directly to PRD but not to DEV or UAT

Configuration: Servers
Admin users are able to create, edit and delete servers from the WIP repository. Server setup are where the admin users will configure the setup and connection to the QlikView and Qlik Sense servers. If you are logged into Qlik Sense you will attain all the Qlik Sense configuration options and vice versa for QlikView and SAPBO.

Please review the Administration Guide for a detailed view on server configurations.

Environment List
You are able to access a specific environment from the servers option and by double clicking on a specific server and selecting the Environment List option from the server Properties window.

Double clicking on an environment will open the Environment edit Properties

In the environment edit properties view you can change the name and description of the environment and define whether Login is enabled for the environment. You can also define whether the specific environment is a Production Environment by checking the provided box.
Security
The environment security options enable you to add groups to the environment that are able to perform different functions on the environment as defined within the group specific configuration.
Clicking on Add Group will provide you with an available list of groups that can be added to the specific environment. Select the group and save your selection.

Assign Environment specific rights to a group by clicking on the provided Permissions options
Read: Groups with this right enabled can read content within an environment
Publish: Groups with this permission can publish into the specific environment selected
Publish For Approval: Groups with this right enabled will have the Publish For Approval workflow enabled for this environment
Change Permissions: Groups with this enabled will be able to change
Publication Properties
Reset Permissions On All Childrens And Enable Propagation
Check List
Check-Lists are configured per environment.
The Admin users can Add Tasks by filling a task name and clicking on the Add Task button.
The administrator users can add optional and required tasks that should be checked as validations that the users have conformed to such required tasks before they are able to publish into the environment.
Once the field has been created the user can then edit the field, or assign the field as a required field or delete the field from the provided action items.

Complexity Analyzer
The complexity Analyzer thresholds setup per environment enables you to set up the complexity per environment. You can drag the various categories measured as part of the complexity index (See Complexity Analysis Index) to set the thresholds you wish to apply to the specific environment.
When you set the complexity thresholds on an environment any file that does not pass all complexity category thresholds will not be allowed to be published into the environment and would require the user to request dispensation from the administrators, who can then publish the file.
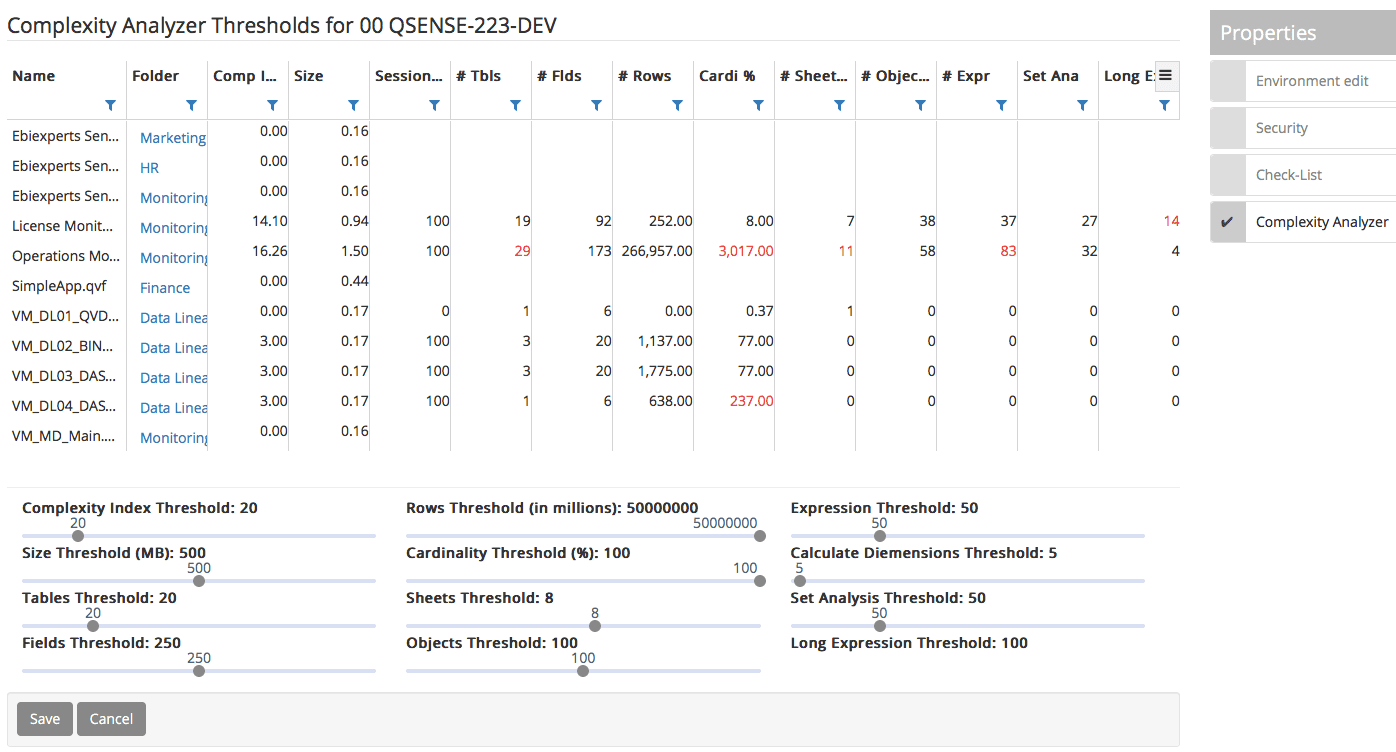
Red numbers are values that exceed the threshold set.
Complexity Index
Each QVW or QVF has a Complexity Index value in the.
The complexity index value is a sum of the different measures of complexity of a QVW/QVF 's content, including number of tables, number of fields, number of sheets, objects, expressions, calculated dimensions, etc.
Administrators users have the option of changing the weighting factor for any of these individual complexity measures as well as setting their thresholds.

Setting the Weight factor

Setting the Thresholds min and max bounds
Configuration: Issue Trackers

WIP Integration to other Agile tools can be setup here. Create a new tracker to integrate to tools such as Jira and be able to sync Issues on WIP’s Board
Configuration Users
Import Users and Manage User settings such as security and licenses
Import from Active Directory
The Active Directory integration configuration option enables the administrator users to define domains and get the domain users and groups automatically synchronized into the WIP user management system.
Alternatively, should you not have an Active Directory server you can import your users from the Qlik Sense QMC or create manually.

User Validation Required
When users request access to the system they will require validation from the admin user as assigning a user to the system requires a license.
Admin users will receive a notification on their dashboards.

Clicking on the user will take the admin to the edit user properties where user rights can be assigned to the user.
Alternatively, the admin user can go directly to CONFIGURATION – Users, and check the “Validation Required” box which will display all users waiting for validation.

The admin user can now assign user rights to the user which will enable the user account access various system functions and assign the user to user groups.

Assigning User Rights
High level user rights are assigned on a user level. It is possible to assign rights to users on the following levels:
QlikView
Qlik Sense
NPrinting
Board
Assigning this right by clicking the checkbox will enable the user to access the Board as a business user or analyst. These rights should be applied to users that wish to access and review their own issues on the Board, and interact through collaboration and notification around their issues.
Activating this for the user will also provide the user access to their own dashboard where they can track all interactions across all their issues.
Files
Publication Properties
Enable Publication
Please Note: Assigning rights to a user will consume a user license based on the rights assigned.

Avatar
The admin user can also assign an avatar to the user.
User can change the avatar or load their own image into the system once access is assigned to the user. Select from default avatars
Users can import their own avatars and images by clicking SELECT TO IMPORT, this will open your file browser where you can browse to the file you wish to import. You will be requested to crop the image to the supported size. Click on Save when done. The image will now display as your current avatar.
Users can drag/drop files into the DRAG AND DROP HERE section. You will be requested to crop the image to the supported size. Click on Save when done. The image will now display as your current avatar.
Client Add-on
The Client Addon is for QlikView and SAP-BI universes only, it allows users to check out QVW, UNV and UNX files to their local machine. Each user should install the addon to their own local machine.
Download the Client Addon from the link provided on this page, the link will take you to the support website where the setup file is located.
Install the Client Addon
Once installed click Save and Test Add-on Connection for a Success message
Override Client IP – by default the WIP Web Server will automatically identify the WIP Addon client IP. Users can change the Client IP address if it is not correct.

Configuration: Groups
Groups are an important configuration for WIP. It is recommended that you always use groups to assign rights to users, meaning that even if you have one user with specific rights that no other user or group of users have, you should still assign that user to a specific group.
Please Note: WIP will automatically create an Administrator group when it is installed

Create
You can create new user groups by clicking on the + Create button
You are requested to provide a Name and Description for the group
Please Note:
You should provide a name and description and save the group before you are able to assign users to the group
You will receive a list of all the licensed users in the system as Available Users, and you can either click on the “Add All” button, or you can drag users into the Allocated Users area, and drop the user to add the user to the Allocated Users area.

Edit
Delete
Clicking on the Delete button will delete any selected groups. There will be a validation requirement pop up that will require you to confirm you wish to delete the selected group(s).
Once you have clicked on the Yes option, the group will be deleted from the repository
Please Note:

Configuration: Business Units
Business Units are an important configuration for WIP. WIP will automatically filter any users lists based on the business unit(s) the users have been assigned to, within the user’s configuration. This configuration makes it easy for users to find their own people within the system.
Please Note:
There will always be a default business unit. You can either use this business unit or change the name of the business unit.

Assign User Rights
High level user rights are assigned on a user level. It is possible to assign rights to users on the following levels:
QlikView
Qlik Sense
NPrinting
Kanban Board
Assigning this right by clicking the checkbox will enable the user to access the Kanban Board as a business user or analyst. These rights should be applied to users that wish to access and review their own issues on the Kanban board, and interact through collaboration and notification around their issues.
Activating this for the user will also provide the user access to their own dashboard where they can track all interactions across all their issues.
Files
Publication Properties
Enable Publication
Please Note: Assigning rights to a user will consume a user license based on the rights assigned.

Avatar
The admin user can also assign an avatar to the user.
User can change the avatar or load their own image into the system once access is assigned to the user. Select from default avatars
Users can import their own avatars and images by clicking SELECT TO IMPORT, this will open your file browser where you can browse to the file you wish to import. You will be requested to crop the image to the supported size. Click on Save when done. The image will now display as your current avatar.
Users can drag/drop files into the DRAG AND DROP HERE section. You will be requested to crop the image to the supported size. Click on Save when done. The image will now display as your current avatar.
Board
The Board configuration options enables the administrator to configure the Board . The administrator can activate various options on the Board according to the available check boxes within the activate columns. Activating these options will display these options on the Board and deactivating them will remove them from the Board this should you not have a To Do area on your current Board just deactivate the To Do option by clicking on the checkbox.
The Board status options “Column” column options will place the options within the columns as defined per status option i.e. when dragging your issues, you will find the status options within the defined columns in your Board
Client Ad-On
The Client Addon is for QlikView and SAP-BI universes only, it allows users to check out QVW, UNV and UNX files to their local machine. Each user should install the addon to their own local machine.
Download the Client Addon from the link provided on this page, the link will take you to the support website where the setup file is located.
Install the Client Addon
Once installed click Save and Test Add-on Connection for a Success message
Override Client IP – by default the WIP Web Server will automatically identify the WIP Addon client IP. Users can change the Client IP address if it is not correct.

Collaboration
Collaboration page on the Boards menu allows administrators to provide useful information for users such as support numbers, websites, linked content, chat groups, etc. You can have up to 4 sections on the page with each section customized here.

Name: Input the name of the entry
Description: A brief description of the entry
Link: Provide a link for this entry, this can be a URL, phone number, email, etc and the link will appear on the “Name”
Submit to create the entry
Attachments
Entries need to be created first before you can upload an attachment to the entry. Once the entry is created click on the edit button for the entry, this will select the entry. Click on “Edit To Upload Attachment”, this will open up the computer explorer where you can choose the file to upload, once selected it is automatically uploaded so no save is needed.
Complexity Analysis
Each Qlik Application has a Complexity Index value in the file. The complexity value of a file is a sum of several different measures of complexity of a file’s content, including number of tables, number of fields, number of sheets, objects, expressions, calculated dimensions, etc. WIP users have the option of changing the weighting factor for any of these individual complexity measures as well as setting their thresholds.
Applications that exceed the threshold of one or more attributes are probably those whose performance could be improved by reducing their complexity. Their improvement is also likely to benefit the QlikView Server performance by reducing system resource requirements.
The measures in the Complexity Indexes are:
Base is the level for factoring into the complexity index. If a file contains tables, sheets, or other objects whose counts are below the base settings, then those elements are not calculated in the complexity index. Any number that exceeds the base is used in the complexity index. For example, if the Tables Base is 5, and a file has 6 tables, then 1 would be used to calculate the complexity index.
The Max value is used as a divisor in the complexity index calculation, so the higher the Max value, the lower the impact of counts that exceed the Base.
The Weight is a multiplier in the complexity index calculation, so the higher the Weight, the greater impact of counts that exceed the Base.
Email
The email configuration is where you will configure the Simple Mail Transfer Protocol (SMTP) of your WIP server. This will require that you have the necessary configuration information of your company SMTP server and have created a user for WIP to be able to send notifications from the system via email.
SMTP Server
SMTP Port
The SMTP port should be assigned as assigned to you SMTP configuration meaning this will allow WIP to access your SMTP server through the defined port. Ports number depend if the SSL option is active or not, can be 465, 587 or 80
Username
Password
From Mail Address
Enable SSL
Validate SMTP
Environmental List
You are able to access a specific environment from the servers option and by double clicking on a specific server and selecting the Environment List option from the server Properties window.

Double clicking on an environment will open the Environment edit Properties

In the environment edit properties view you can change the name and description of the environment and define whether Login is enabled for the environment. You can also define whether the specific environment is a Production Environment by checking the provided box.
Security
The environment security options enable you to add groups to the environment that are able to perform different functions on the environment as defined within the group specific configuration.
Clicking on Add Group will provide you with an available list of groups that can be added to the specific environment. Select the group and save your selection.
Assign Environment specific rights to a group by clicking on the provided Permissions options
Read: Groups with this right enabled can read content within an environment
Publish: Groups with this permission can publish into the specific environment selected
Publish For Approval: Groups with this right enabled will have the Publish For Approval workflow enabled for this environment
Change Permissions: Groups with this enabled will be able to change
Publication Properties
Reset Permissions On All Children And Enable Propagation
Check-Lists
Check-Lists are configured per environment.
The Admin users can Add Tasks by filling a task name and clicking on the Add Task button.
The administrator users can add optional and required tasks that should be checked as validations that the users have conformed to such required tasks before they are able to publish into the environment.
Once the field has been created the user can then edit the field, or assign the field as a required field or delete the field from the provided action items.
Complexity Analysis
The complexity Analyzer thresholds setup per environment enables you to set up the complexity per environment. You can drag the various categories measured as part of the complexity index (See Complexity Analysis Index) to set the thresholds you wish to apply to the specific environment.
When you set the complexity thresholds on an environment any file that does not pass all complexity category thresholds will not be allowed to be published into the environment and would require the user to request dispensation from the administrators, who can then publish the file.
Red numbers are values that exceed the threshold set.
Complexity Index
Each QVW or QVF has a Complexity Index value in the.
The complexity index value is a sum of the different measures of complexity of a QVW/QVF 's content, including number of tables, number of fields, number of sheets, objects, expressions, calculated dimensions, etc.
Administrators users have the option of changing the weighting factor for any of these individual complexity measures as well as setting their thresholds.
Setting the Weight factor
Setting the Thresholds min and max bounds
Extensions
This page shows all the possible file extensions that you are able to import into WIP and how WIP will process the file. It is recommended that you leave these configurations as default but should you wish for a file to be processed differently you can configure it here.
Double click on “Process As” for the extension to bring up the drop down, select the new extension and click Save at the bottom of the page.
Import From Active Directory
The Active Directory integration configuration option enables the administrator users to define domains and get the domain users and groups automatically synchronized into the WIP user management system.
Alternatively, should you not have an Active Directory server you can import your users from the Qlik Sense QMC or create manually.
License
The WIP license section enables the administrator user to paste the license code into the license area defined and to save the code. Once saved the license code will unlock the license amounts as have been defined by the code provided to the system.
The license code will unlock the Product options and number of licenses per product option. The administrator user can come to the license section to review how many of which product option has been assigned to users throughout the system. The license will also reflect the expiry date of the license. This will inform the administrator user as to when the license should be renewed.
Publication Workflow
Publish Workflow is on an environment level, it allows Administrators to set up the promotions between environments. All publication users have to follow the promotion path as defined here.
Default
Default options means users are able to Publish to any environment, there is no path users need to follow.

Promotion Workflow
This is where you set promotions between your environments, with all check boxes un-ticked means that users need to publish versions from DEV – UAT – PRD in that order.
DEV-PRD – if the version is in DEV, users can publish from DEV to PRD but cannot publish to UAT
NP-UAT – if the version has not been published yet, users can publish directly to UAT but not to DEV or PRD
NP-PRD – if the version has not been published yet, users can publish directly to PRD but not to DEV or UAT

User Validation
When users request access to the system they will require validation from the admin user as assigning a user to the system requires a license.
Admin users will receive a notification on their dashboards.

Clicking on the user will take the admin to the edit user properties where user rights can be assigned to the user.
Alternatively, the admin user can go directly to CONFIGURATION – Users, and check the “Validation Required” box which will display all users waiting for validation.

The admin user can now assign user rights to the user which will enable the user account access various system functions and assign the user to user groups.

