ebiexperts |

|
Connect WIP to NPrinting Server |


 Installation Guidelines |
CONFIGURATION MANAGEMENT | |||
Doc ID: | WIP Connect to NPrinting Server | Issue Date: | 04 November 2019 |
Author: | Golay Jean-Philippe | Status | Production |
Table of Contents
| Table of Contents |
|---|
...
WIP Training 04 Connect NPrinting Server
NPrinting user’s Roles
In Order to manage NPrinting reports WIP Users must be defined as
Browse / Checkout
The NPrinting Server browsing and checkout is done using the <WIP Log On> User he must have be an administrator on NPrinting Server in order to export the reports
Publish
The NPrinting Server publish is done using <WIP Proxy User>. If no <WIP Proxy User> is defined then WIP will use <WIP Log On>. <WIP Proxy User> or <WIP Log On> User he must have be an administrator on NPrinting Server in order to export the reports
...
Create New NPrinting Server
...
In Details tab Press Copy to file
...
Press Next
...
Select DER encoded binary X.509 (.CER)
...
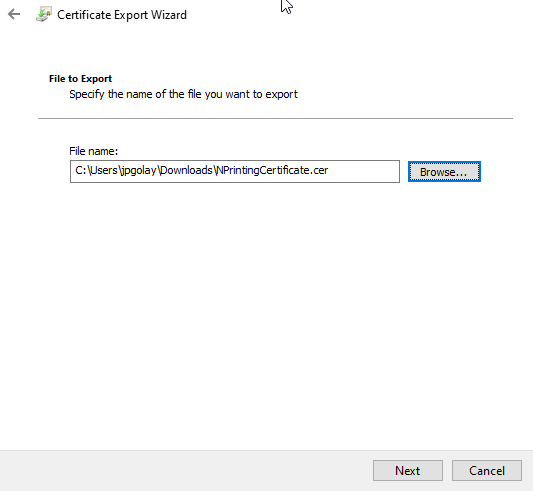
Choose filename and press Next to export

Import NPrinting Certificate in WIP
In WIP NPrinting server press the “Certificate” button, select the just exported NPrinting certificate and press Open.
...
Press Save and Import button
...
WIP should display “Saved Certificate CN=…”
...
Create a user in WIP that is defined as an Administrator in NPrinting (see NPrinting user’s Roles)
...
Test the NPrinting server, log on WIP with a user with a NPrinting license assigned
...
open NPRINTING in MANAGE CONTENT, create a root folder and press the N icon, browse a report and press “Check-in(1)”
...
Et voilà WIP is now connected to NPrinting, for any issue please contact ebiexperts Support at support.ebiexperts.com