Introduction
Common install guide for WIP, SAM and Active Backup for administrators. Use this guide for a detailled technical installation, will cover prerequisites, software installation, connect to the database repository, and configuration.
|
Installation Guide for WIP, SAM and Active Backup (AB) |

Table of Contents
| Table of Contents |
|---|
...
Backing up the repository database and config file is enough to restore an ebiexperts installation
Backup the “WipDbSettings.config” file stored in
C:\ProgramData\ebiexperts\[WIP | SAM | BAK] Web Server\webapp.
this file store database connection and web server information for the product setup
Repository database
Embedded Mariadb database:
backup/restore the folder C:\ProgramData\ebiexperts\[WIP | SAM | BAK]Web Server\repository\[wip|sam|bak]
External Database (SQLServer, Oracle..)
use your standard database backup/restore
Downloading Installation Program
The installation file can be downloaded from Software Download
Register or login to access the Downloads section.
Double-click the Setup.exe file to start the installation.
...
Run the installation program
It is recommended that you install ebiexperts products as Administrator (Right Click install file and select “Run as administrator”)
When the Welcome dialog opens, read the information and click Next.
...
Choose a Personalized Setup
...
Provide either SQL Server Authentication with database Username and Password or Use Windows Authentication
Windows Authentication – an administrative user of the machine on your domain.
Use SQL Server Authentication – the credentials used to access your SQL server.
Enable “Save my password” if SQL Server Authentication is selected
...
Click: OK to return to Setup
Click Update Database Note: you might always make a backup of your database before making any database upgrade.
...
Click “Upgrade” for WIP Setup to create standard database tables utilized by the WIP Web Server.
...
By default, an outside machine will not allow you to connect to their machine. You need to create an Inbound Rule to allow the connection.
Copy the Port number.
Go to Windows Firewall With Advanced Security.
...
Inbound Rules
Create a new rule by clicking “New Rule…” on the right
...
Select “Port”
...
Select “TCP” and specify the Port number, paste the port number that you copied in the clipboard
...
By default the log files are stored in C:\ProgramData\ebiexperts\TEMP"
It’s possible to move the log files using NLog.config
Set value to new destination in <variable name="logDir" value="C:\ProgramData\ebiexperts\TEMP" />
replace fileName="${basedir}/log/... by fileName="${logDir}/log/...
...
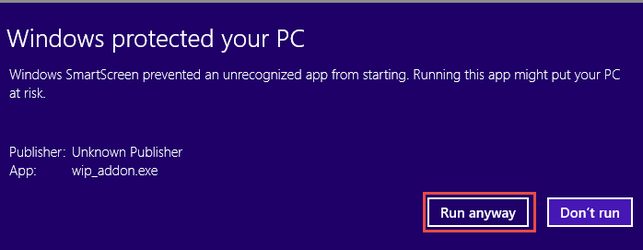
As the program is not signed it's possible that you have to bypass Windows SmartScreen like this:
Installation and Update
| Note |
|---|
In order to run WIP Addon you need to have Administrator Rights. If you are single user you will need to install as Administrator ad need to set URLACL rights as described below |
...

Set URLACL rigth for single users
Run an elevated cmd and type following command
| Code Block | ||
|---|---|---|
| ||
netsh http add urlacl url=http://+:59282/ user=DOMAIN\User listen=yes
for a group of users:
netsh http add urlacl url=http://+:59282/ user=BUILTIN\Users listen=yes
multiple ports on a shared machine
for /L %i in (59282,1,59284) do netsh http add urlacl url=http://+:%i/ user=BUILTIN\Utilisateurs listen=yes |
Once installed you should have a Tray Icon like below
...
It's also possible to display a debug console.
Stop the Wip Addon
Run C:\Program Files (x86)\ebiexperts WIP Addon\WIPAddonTray.exe /debug
...
WHAT NEXT?
Once you have installed and setup the database repository, please consult the
...