QVAUctor ltd |

|
Connect WIP to QlikView Server |
Installation Guidelines |


 |
CONFIGURATION MANAGEMENT | |||
Doc ID: | WIP Connect to QlikView Server | ||
Author: | Golay Jean-Philippe | Issue Date: | 04 November 2019 |
Table of Contents
| Table of Contents |
|---|
...
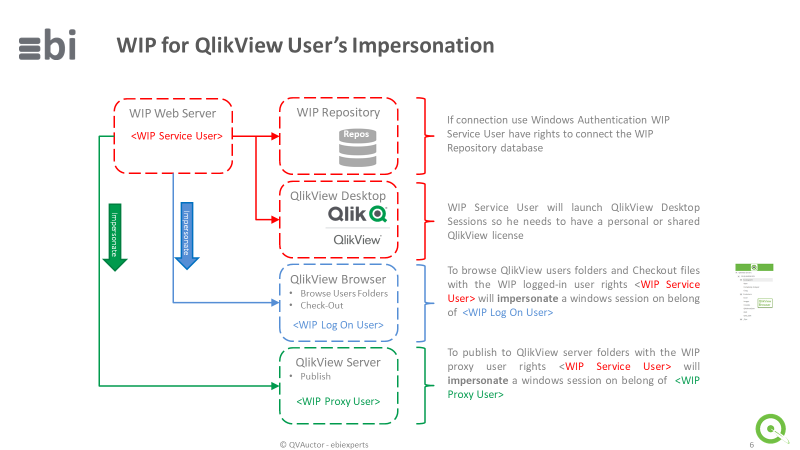
As WIP is a Web Server it’s the user starting the service (WIP Service User) will interact with database and launch QlikView sessions
In order respect Windows user’s security WIP Web Server will impersonate (create a local windows session) on belong of the <WIP Log On> user or the WIP Proxy user. The proxy user is the user defined in the QlikView Server.
...

Impersonation
As WIP service is running with the WIP Service User credentials in order to browse logged-in user folders with the correct credentials, WIP Service User must have the right to create a windows session in behalf of the logged-in user (Impersonate)
Also, the user being impersonated must have the right to logon locally on the windows server where WIP is installed.
Browse QlikView Servers
The QlikView Server browsing is done using the <WIP Log On> User he must have Read right on Qlik View Server shares and folders defined in WIP QlikView Server
...
The checkout is done using <WIP Log On> User and this user must have Windows AD RW right on destination checkout path.
If you want the WIP Web Server to checkout to your local machine install the WIP Addon and prefix the Destination path by «@» (@C:\QlikViewApps)
Publish
The QlikView Server publish is done using <WIP Proxy User>. If no <WIP Proxy User> is defined then WIP will use <WIP Log On>. <WIP Proxy User> or <WIP Log On> must have WRITE and CREATE FOLDER right on publish destinations shares or folders.
...
Press Shift+Right Click / Run as a different user and enter the user’s credentials
...
Install and configure QlikView Desktop
...
Then press Connect will assign a license. It’s the best way to assign a license it as if license expires it will fetch a new one
...
Assign a QlikView License Key
...
Install WIP
Ask us for the link to our Google Drive or FTP
...
Under dailybuild you can find your Service Pack. Only install from that folder if instructed by ebiexperts.
...
Installation
Launch WIP Installer
...
Select Complete Setup and click Next.
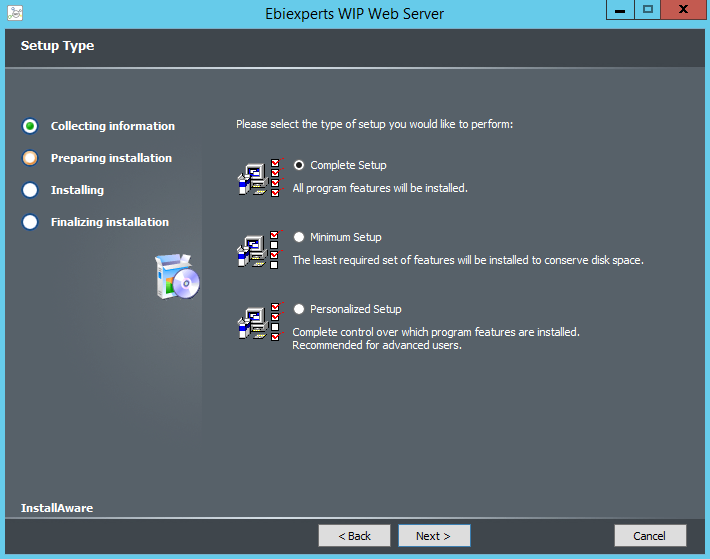

You will be required to input the credentials of the Service User that will launch WIP Web Server. This user needs to be an Administrator of the machine, the password is required as this user will be used to start the WIP service.
...
Else if you are not logged in Windows with the WIP Web Service user entered in the WIP Installed and want to connect the repository database with windows integrated security locate
C:\ProgramData\ebiexperts\WIP Web Server\webapp\WIPSetup.exe
and run it as same user than the WIP Web Server Service User to have the same database credentials
...
In short for SQLServer select OLEDB SQLServer and press the “…” button right to Database Connection
...
Enter your connection Server and select Database then press Test Connection
Remark: as you see if you “Use Windows Authentication” the Logon User will connect the database. So in order to use same WIP Web Server Service user credentials
Logon Windows as WIP Web Server Service User
Rus WIPSetup.exe as WIP Web Server Service User
...
Back in the Database tab press Update Database.
...
Go Back to WIP Setup select the QlikView Versions, click on Default to QV12 and press the Launch Default QV, should launch QlikView 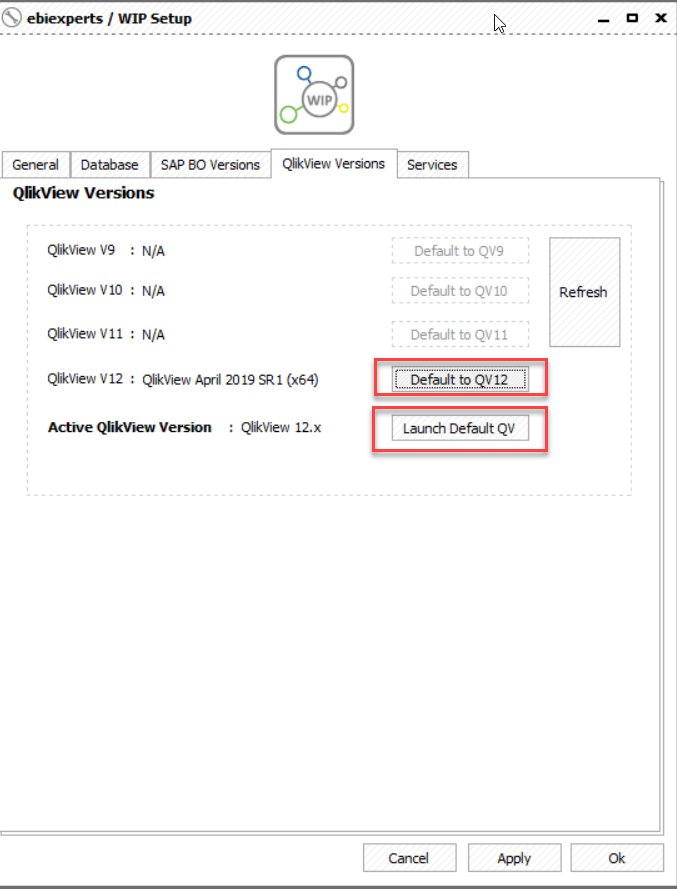
...
Double check that QlikView is not in Personal Edition in the Windows Title
...
More details on WIP Web Server Configuration is available in WIP Install Guide in chapter “WIP Services”
...
Check the WIP Web Server Service Credentials
Run services.msc check the login account is correct should have access to the database if using Integrated SQLServer Security and start the service. (Restart it if you change something)
...
...
Check the WIP Web Server Service User’s Authorizations
...
“Impersonate a client after authentication”
“Logon as a service”
“Act as part of the operating system”
...
Check that all users that will log into WIP can login to this machine
...
Run as different user and enter your user credentials. If it fails or your user have not the rights to “impersonate a user after authentication” or the user have not the right to logon to this machine, see with your administrator
...
Testing WIP for QlikView
Enter WIP License
...
Enter your license in Options / License and check that you have a WIP QlikView User License
...
Create a New QlikView Server
...
You can ask WIP to use publisher to reload published applications.
Checkout
Note that check-out of QlikView apps will still occurs on WIP server as the applications are not in the publisher apps.
Activate the Publisher reloads
Open the QlikView Server, and check Use Publisher for Reloads & Schedules

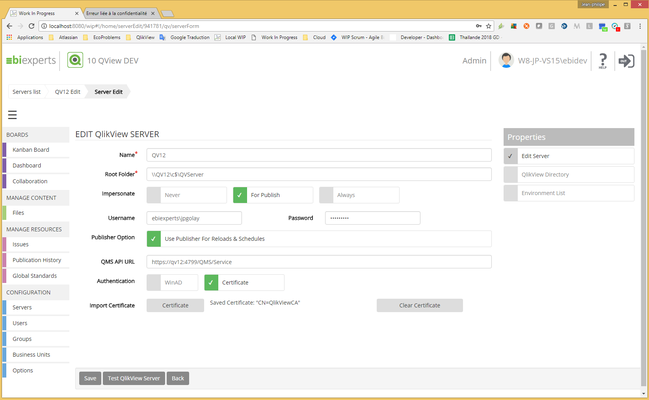
Fill the QMS API URL as https://qv12:4799/QMS/Service
if the QMS url starts with "http" check the WinAD authentication
if the QMS url starts with "https", check the Certificate authentication
Press the Certificate button, select the QMS .pfx file and press save
Press the "Test QlikView Server" button
Remark : Add the WIP Proxy User in the “QlikView Management API” Group on the Qlik View Publiosher server. If the group does not exists create it
How to export the QMS certificate
Windows / run mmc.exe, Add / Remove Snap-in
...
Add certificates / Computer account
...
Find the QlikView certificate, issued by is generally "QlikViewCA" and export it
...
Export the private Key
...
Use Personal Information Exchange – PKCS #12 (.PFX) Format
...
IMPORTANT: Password must be set to "ebiexperts"
...
Export the certificate
...